
If you live in Minnesota, you know our ground doesn’t sit still. The relentless freeze-thaw cycle can turn a beautiful new paver patio into a lumpy, uneven mess. The solution isn’t to fight the weather, but to build smarter. A properly constructed paver base with the right materials is designed to handle this movement. While compacted gravel provides the muscle, the one-inch sand bed is what allows for a perfectly flat surface that stays that way. Finding the right coarse sand for paver base Minnesota North Metro homeowners need is a critical step that many overlook. We’ll show you the local pro tips for building a base that can stand up to a Minnesota winter.
Key Takeaways
- Build a Frost-Proof Foundation: For a paver project that survives Minnesota winters, you must excavate correctly. Plan for a total depth of about nine inches to accommodate a six-inch compacted Class 5 gravel base, a one-inch coarse sand bed, and the pavers themselves.
- Compact in Layers for Unshakeable Strength: A solid base is not built all at once. After compacting the native soil, add your Class 5 gravel in two-inch layers, compacting each one thoroughly before adding the next to create a dense, stable foundation that prevents sinking.
- Choose the Right Materials for the Job: Your project’s success depends on using the correct aggregates. Use Class 5 gravel for its compacting strength, coarse sand for a level bedding layer, and polymeric sand to lock joints; never use unstable materials like dirt or pea gravel for your base.
Why a Strong Paver Base Matters in Minnesota
Building a beautiful paver patio, walkway, or driveway is a serious investment of time and money. Here in Minnesota, the secret to a project that lasts for decades isn’t just the pavers you choose, but the foundation you build beneath them. A strong, properly installed paver base is your project’s best defense against our state’s demanding climate. Without it, you risk facing uneven surfaces, shifting pavers, and drainage problems within just a few seasons.
Think of the base as the unsung hero of your hardscape. It provides the stable platform your pavers need to stay level and locked in place. Taking the time to get this part right ensures your hard work pays off, giving you a durable and attractive surface that stands up to everything Minnesota weather throws at it. From the heavy spring rains to the deep winter freezes, a solid base is what separates a professional-looking project from a DIY disaster.
Understanding Minnesota’s Freeze-Thaw Cycle
If you’ve lived through a Minnesota winter, you’re familiar with the freeze-thaw cycle. This relentless process is tough on our roads, and it can be just as tough on your paver project. When moisture in the ground freezes, it expands and pushes the soil upward (a process called frost heave). Then, as it thaws, the ground settles back down, often unevenly. A well-constructed base helps mitigate these effects by creating a stable, load-bearing layer that resists this movement. It provides a buffer between your pavers and the shifting soil, preventing the heaving and sinking that can ruin a perfectly good patio.
Working with Local Soil Conditions
Minnesota’s landscape is diverse, and so is our soil. From heavy clay near the riverbeds to sandy loam in other areas, the native soil you’re building on can greatly affect your project’s stability. Clay soils, for example, hold a lot of water and expand significantly when they freeze, while sandy soils drain well but can be less stable. Because of this variability, you can’t just dig out some dirt and hope for the best. Creating a proper base involves removing the unpredictable topsoil and replacing it with consistent, engineered materials that you can compact into a solid, reliable foundation. This step is crucial for ensuring the integrity of your paver installation for years to come.
Why Good Drainage is Essential
A strong paver base does more than just provide support; it’s also your project’s primary drainage system. Water is the biggest enemy of any hardscape. If it pools beneath your pavers, it can lead to shifting, settling, and failure, especially during the spring thaw. The key is to use materials that allow water to drain through and away from the paver surface. A compacted base made from materials like Class 5 gravel creates the perfect drainage field. It provides the necessary strength while ensuring that water doesn’t get trapped, protecting your investment from the ground up.
What Are the Best Materials for a Paver Base?
Choosing the right materials for your paver base is the most important decision you’ll make for the longevity of your patio or walkway. In Minnesota, where the ground is constantly shifting, a solid foundation isn’t just a good idea; it’s essential. The right combination of gravel and sand creates a stable, well-drained base that can withstand our freeze-thaw cycles and prevent your pavers from sinking or heaving. Let’s walk through the key materials you’ll need to build a paver project that lasts.
Class 5 Gravel: Your Project’s Foundation
Think of Class 5 gravel as the backbone of your entire project. This dense mixture of crushed rock and sand compacts tightly, creating a solid, stable layer that distributes weight evenly and allows for excellent drainage. For a standard patio or walkway, you’ll need a base of at least six inches. The best way to achieve this is by spreading the Class 5 gravel in two-inch layers. After spreading each layer, lightly mist it with water to keep dust down and help with compaction. Then, run a plate compactor over the entire area until it’s firm. Repeating this process gives you the unshakeable foundation your pavers need to stay put for years to come.
Coarse Sand: The Ideal Bedding Layer
Once your gravel base is compacted and level, it’s time for the bedding sand. This is not the same sand your kids play in; you need coarse, washed sand to create a one-inch layer on top of the gravel. This layer serves a critical purpose: it provides a smooth, even surface to set your pavers into. The coarse texture of the sand allows for slight adjustments as you lay each paver, helping you get tight joints and a perfectly flat surface. It also plays a role in drainage, allowing any water that seeps through the joints to move away from the pavers and down into the gravel base.
Polymeric Sand: How to Lock Your Pavers in Place
After all your pavers are laid and compacted, you’ll notice small gaps between them. Filling these joints is the final step to creating a durable, low-maintenance surface. Polymeric sand is the best material for the job. This special blend of sand and polymers hardens when activated with water, effectively locking your pavers together like glue. Using polymeric sand is a pro move that helps prevent weeds and ant hills from popping up between your pavers. It creates a flexible yet incredibly strong bond that resists erosion from rain and wind, keeping your patio looking clean and pristine.
Geotextile Fabric: An Extra Layer of Stability
For an extra layer of insurance against Minnesota’s tricky soil conditions, consider laying down geotextile fabric before you add your gravel base. This permeable fabric acts as a separator between your soil subgrade and the Class 5 gravel. Why is this helpful? It prevents the gravel from sinking into the soil over time, which is a common cause of paver failure. It also adds another layer of stability and improves drainage, keeping your base materials from becoming saturated. While it’s an optional step, using geotextile fabric is a smart, simple way to give your project maximum strength and durability from the ground up.
What Materials to Avoid for Your Base
Using the wrong materials is a shortcut to a failed paver project. Never use dirt or pea gravel for your base. Dirt holds moisture and will turn to mud, while pea gravel is too rounded to compact and will shift constantly under the pavers. You might also hear about people using only sand for their entire base. While some DIYers have tried this for small garden paths, it’s not a stable solution for a patio or driveway. A sand-only base won’t provide the rigid support needed to prevent pavers from shifting and settling over time, especially with the ground movement we see in Minnesota. Stick with the proven combination of compacted Class 5 gravel and a coarse sand bedding layer.
How Deep Should You Dig Your Paver Base?
Getting your paver base right starts with one simple, but crucial, step: digging. If you don’t dig deep enough, your beautiful new patio or walkway can sink, shift, or become uneven over time, especially with our Minnesota winters. The goal is to create a stable foundation that can handle foot traffic, patio furniture, and the constant freeze-thaw cycles that can wreak havoc on hardscaping projects. Think of it like building a house; you wouldn’t build on shaky ground, and the same principle applies here.
The total depth you need to excavate isn’t just a random number. It’s a calculated depth that accounts for three distinct layers: a thick base of gravel for stability, a thin layer of sand for leveling, and the pavers themselves. By preparing the ground correctly from the start, you’re setting your project up for success and ensuring it looks great for years to come. It might seem like a lot of digging, but trust me, the extra effort now will save you from major headaches and repairs down the road. Let’s break down exactly how deep you need to go.
Calculate Your Total Excavation Depth
For most standard patios and walkways, a total excavation depth of about 9 inches is the magic number. This gives you the perfect amount of space for a rock-solid foundation. Here’s how it breaks down: you’ll need 6 inches for your compacted gravel base, 1 inch for your sand bedding, and about 2.5 inches for the thickness of your actual pavers.
This depth ensures your project has a sturdy base that can properly drain water and withstand ground movement. By digging to this depth, you create a strong buffer that protects the pavers from the shifting soil below. It’s a straightforward formula that provides the stability needed for a durable, long-lasting surface that can handle everything from summer barbecues to heavy winter snow.
Install the Gravel Layer
Once you’ve excavated your area, it’s time to build your foundation with gravel. The key to a strong base is to build it in layers. Start by spreading a 2-inch layer of Class 5 gravel across the entire area. Lightly spray the gravel with a hose to keep dust down and help with compaction. Then, using a plate compactor, go over the entire surface until it’s firm and level.
You’ll repeat this process, adding 2 inches of gravel and compacting it, until you have a solid, 6-inch-deep base. Don’t be tempted to dump all 6 inches in at once; compacting in thinner layers is the only way to ensure there are no soft spots. This step is what gives your paver project its strength and prevents sinking.
Create the 1-Inch Sand Bed
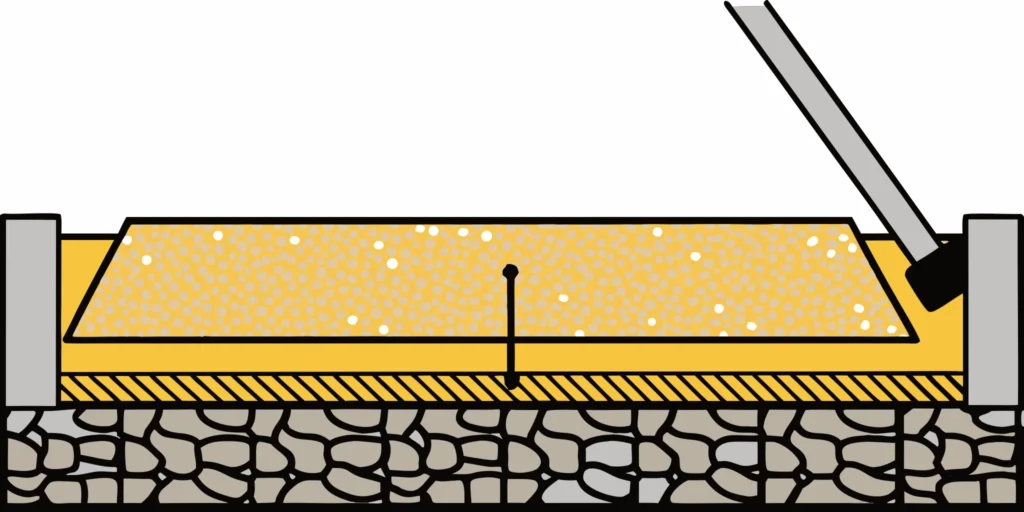
With your compacted gravel base complete, the next step is to add the sand bed. This layer provides a smooth, even surface to lay the pavers on, making it much easier to get them perfectly level. You’ll want to spread a consistent 1-inch layer of coarse sand over the gravel. A pro tip is to only spread as much sand as you can cover with pavers in one day. An exposed sand bed can be ruined by a sudden rainstorm or disturbed by neighborhood critters.
This sand layer isn’t meant for structural support; its job is to hold the pavers in place and make minor height adjustments simple. Once the sand is down, you can screed it to create a perfectly flat surface before you begin laying your pavers.
Prepping Your Site: 4 Steps Before Adding Sand
Before you can even think about laying that perfect one-inch layer of sand, you need to get your hands dirty. Proper site preparation is the single most important factor in creating a paver patio or walkway that lasts for years without sinking or shifting. Rushing this stage is a recipe for future headaches. Follow these four essential steps to build a solid foundation for your project.
Step 1: Mark, Measure, and Call 811
First, outline the shape of your new patio or walkway on the ground. A garden hose is perfect for playing with curves and finding the right layout. Place some outdoor furniture inside the outline to get a real feel for the space. Once you’re happy with the shape, take measurements and draw a simple sketch. This will help you figure out how much material you need with our Cubic Yardage Calculator.
Before you dig a single shovel of dirt, you must call 811. In Minnesota, this connects you to Gopher State One Call, who will mark the location of any underground utility lines for free. It’s a simple, required step that prevents dangerous and costly accidents.
Step 2: Excavate and Grade for Drainage
With your area marked and clear of utilities, it’s time to excavate. For a standard paver project, you’ll need to dig down about nine inches. This depth accounts for a six-inch gravel base, a one-inch sand bed, and the pavers themselves. As you dig, it’s critical to establish a proper grade for drainage. Your patio needs to slope away from your house foundation or any other structures.
A good rule of thumb is a drop of about one-eighth to one-quarter inch for every foot of distance. This gentle slope ensures rainwater runs off instead of pooling and causing problems. Our skid steer services can make quick work of excavation and grading for larger projects.
Step 3: Compact the Soil Subgrade
After you’ve dug out the area to the correct depth and grade, you’re left with the exposed soil, known as the subgrade. This soil is likely loose from excavation and needs to be firmed up to create a stable foundation. Using a machine called a plate compactor, go over the entire area multiple times until the ground is solid and doesn’t give under your feet.
Don’t skip this step. A compacted subgrade is your first line of defense against the ground settling over time, which is what causes pavers to become uneven. A solid base here means a level patio for years to come.
Step 4: Install Your Edging
Your final prep step is to install edging around the perimeter of your excavated area. This rigid border, often made of plastic or metal, acts as a container for your base materials and locks the final pavers in place. Position the hardscape edging firmly against the inside walls of your excavated site. Secure it by driving 10-inch steel spikes through the provided holes about every two feet.
This frame is essential for preventing the gravel and sand from washing out and keeps your pavers from shifting outward under pressure. Once the edging is secure, you’re officially ready to start adding your base materials.
How to Install Sand and Lay Pavers
With your base prepared and compacted, you’re on the home stretch. This is where your project really starts to look like a finished patio or walkway. Getting the sand layer perfectly level and carefully placing your pavers are the keys to a professional-looking result that will last for years. Let’s walk through the final three steps to bring your vision to life.
Screed the Sand for a Level Surface
The secret to a perfectly flat paver surface is a process called screeding. It’s best to only spread the sand when you are ready to lay pavers, since an unexpected rainstorm or a neighborhood cat can ruin your perfectly graded surface. To screed, lay two 1-inch PVC pipes parallel to each other across the compacted gravel base. Shovel your coarse bedding sand between the pipes, then pull a straight 2×4 across the top of them. This action removes the excess sand and creates a smooth, level bed. Carefully remove the pipes and gently fill in the small trenches left behind with a bit of sand.
Lay the Pavers and Compact
Now for the fun part. Start laying your pavers, beginning in a 90-degree corner if your design allows. Place them straight down onto the sand bed; don’t slide them into place, as this can disrupt the level sand. It’s very important to avoid walking or kneeling directly on the pavers you’ve just laid. Wait until they have been compacted, otherwise, they can settle unevenly and create a wobbly surface. Once all the pavers are in position, run a plate compactor over the entire area. To prevent scuffing your new pavers, place a piece of cardboard or a rubber mat between the compactor and the paver surface for this final pass.
Fill the Joints and Seal the Surface
The final step is to lock everything together by filling the joints. You can sweep a washed sand into the gaps, but for maximum durability, I recommend using polymeric sand. This special type of sand contains polymers that harden when activated with water, which helps prevent weed growth and keeps ants from building hills between your pavers. Carefully sweep the polymeric sand into all the joints until they are full. Be sure to follow the manufacturer’s specific instructions for application and watering, as the process can vary slightly between brands. This step not only gives your project a clean, finished look but also ensures its long-term stability.
Common Paver Base Mistakes to Avoid
Building a paver patio is a rewarding project, but a few simple missteps can lead to a lumpy, uneven surface that won’t last. After putting in all that effort, the last thing you want is to see your hard work undone by a shifting base. Let’s walk through some of the most common mistakes I see people make so you can get it right the first time and build a patio that stands strong for years.
Using the Wrong Materials
Choosing the right materials is the most critical part of building a durable base. Some online forums suggest using about four inches of a compacted base with an inch of sand on top, which is a good starting point. However, the type of material is what really counts. You need a compactible gravel like Class 5 for your main base, not pea gravel or river rock, which will shift and slide. For the bedding layer, you need coarse washed sand, not play sand or masonry sand. Using the wrong stuff will create an unstable foundation that causes pavers to sink and separate over time.
Forgetting to Compact Each Layer
A solid base is a compacted base. Simply dumping your gravel and spreading it around isn’t enough. You need to compact the native soil after you excavate and then compact the gravel base in two- to three-inch lifts. As experts at Gertens note, “Renting a gas-powered compactor is highly recommended. It makes the base much stronger and saves a lot of time compared to hand-tamping.” Skipping this step or trying to do it by hand will leave you with a weak foundation that settles unevenly, creating a wavy, hazardous surface. If you need help with site prep, our skid steer services can make quick work of excavation and grading.
Ignoring Proper Drainage and Slope
Water is the biggest enemy of a paver patio. If you build a perfectly flat surface, rainwater will pool and seep into the joints, weakening the base and causing pavers to heave during our Minnesota winters. To prevent this, you need to build a slight slope away from your house. A good rule of thumb is to create a drop of about 1/8 to 1/4 inch for every foot of distance. This gentle grade is barely noticeable to the eye, but it’s enough to direct water away from your foundation and keep your patio base dry and stable.
Not Digging Deep Enough for Frost
Here in Minnesota, we have to account for the frost line. When the ground freezes, it expands and can push your pavers upward in a process called frost heave. To prevent this, you need to dig deeper than you might think. For a standard patio, you should plan to dig down at least nine inches. This depth allows for a solid six-inch compacted gravel base, a one-inch sand bed, and the pavers themselves. A deep, well-compacted base provides the stability needed to resist ground movement and keep your patio level through every freeze-thaw cycle.
How Much Sand and Gravel Do You Need?
Figuring out exactly how much material to order can feel like a tricky math problem, but it doesn’t have to be. The last thing you want is a pile of leftover gravel on your lawn or, even worse, running out of sand midway through your project. Getting the quantity right from the start saves you time, money, and a major headache. The key is to calculate the volume for each layer of your base separately.
To find the volume, you’ll measure the length and width of your project area in feet, then multiply that by the depth of the material, also converted to feet. For example, for a 6-inch gravel base, you would use 0.5 feet for your depth. But here’s the part that trips people up: you buy aggregates by the cubic yard, not the cubic foot.
Instead of wrestling with conversions and risking a miscalculation, you can use a tool built for this exact task. Our online cubic yardage calculator makes it simple. Just enter the dimensions of your project area and the depth for each layer, and it will tell you precisely how many cubic yards of material you need. Once you have your numbers, you can easily arrange for Class 5 delivery for your foundation and a separate sand delivery for your bedding layer, ensuring you have exactly what you need to get the job done right.
Get the Right Materials Delivered for Your Project
Once you have a plan, it’s time to gather your supplies. Getting the right materials for your paver project is the first step toward a beautiful, long-lasting patio or walkway. Here’s a quick rundown of what you’ll need to have on hand before you start digging.
- Pavers: This is the fun part where you define the look of your space. You can choose from concrete, clay, or natural stone pavers, each offering a different style and level of durability. You can find a great selection at local landscaping centers that specialize in hardscape products.
- Base Material: A solid foundation starts with a quality base. We recommend using about four inches of compacted Class 5 gravel to create a stable layer. This provides excellent drainage and helps prevent heaving during Minnesota’s notorious freeze-thaw cycles.
- Bedding Sand: On top of your compacted gravel base, you’ll add a one-inch layer of coarse sand. This is the layer you’ll actually set the pavers into, as it helps with leveling and provides a crucial cushion. We can handle your sand delivery so you have exactly what you need for this step.
- Edging: To keep your pavers locked in place and prevent them from shifting over time, you’ll need to install plastic or aluminum hardscape edging around the perimeter of your project.
Hauling dozens of heavy bags from the store is a tough job that can drain your energy before you even begin. You can save your back and your time by having the bulkiest materials delivered right to your driveway. This lets you focus on the project itself, not the logistics of getting everything there. If you’re not sure how much material you need, our handy cubic yardage calculator can help you figure out the exact amount.
Related Articles
- What Type of Sand for Paver Base? A Pro Guide – Minnesota Aggregates
- Road Base Cost Per Yard: A Complete Price Breakdown – Minnesota Aggregates
- How to Use Paver Sand to Stop Weeds: A Pro Guide – Minnesota Aggregates
Frequently Asked Questions
Can I just use sand for the entire base instead of gravel? While it might seem like an easier shortcut, using only sand for your base is a recipe for a failed project. Sand doesn’t compact into a rigid, stable foundation the way Class 5 gravel does. It will shift and wash out over time, especially with our Minnesota rain and snowmelt, causing your pavers to sink and become uneven. The gravel layer is what provides the structural support; the sand is just a thin setting bed on top.
Do I really need to rent a plate compactor for a small project? Yes, you absolutely do. I know it’s tempting to try and save the rental fee by tamping the ground by hand, but it’s just not the same. A plate compactor applies thousands of pounds of force, creating a densely packed base that won’t settle later. Without proper compaction, you’ll end up with soft spots that lead to a wavy, uneven patio within a year or two. It’s a crucial step for a professional, long-lasting result.
Why is a 6-inch gravel base necessary for Minnesota? It seems like a lot. That 6-inch depth is your best defense against Minnesota’s freeze-thaw cycle. When the moisture in the ground freezes, it expands and pushes upward (a process called frost heave), which can ruin a paver surface. A thick, compacted gravel base creates a stable buffer that resists this movement and allows water to drain away effectively. A shallower base might be fine in a warmer climate, but here, it’s a necessary investment to keep your patio level for decades.
My yard looks perfectly flat. Do I still need to create a slope for my patio? Even if your yard appears level, you must build a slight slope into your paver project. Water is the number one enemy of any hardscape. The goal is to create a grade of about one-quarter inch per foot, sloping away from your house foundation. This gentle slope is almost unnoticeable to the eye, but it’s enough to ensure that rainwater runs off the surface instead of pooling and seeping down into the base materials, which can cause shifting and settling.
What’s the difference between the sand for the base and the sand for the joints? This is a great question because using the right sand for each step is critical. The one-inch layer on top of your gravel base should be coarse bedding sand; its purpose is to create a smooth, level surface to set the pavers into. After the pavers are laid, you fill the gaps between them with polymeric sand. This special sand has additives that harden when wet, locking the pavers together and preventing weeds and ants. They are not interchangeable.