It’s a frustrating cycle every homeowner knows: you spend a weekend building a beautiful paver patio, only to spend the rest of the summer on your hands and knees pulling weeds from between the cracks. It can feel like a losing battle. The secret to breaking this cycle isn’t a special spray or tool; it’s in the material you use from the very beginning. Using the right paver sand to stop weeds does more than just fill the gaps. It creates a solid, durable barrier that locks your pavers in place and makes it nearly impossible for stubborn dandelions and crabgrass to take root, giving you a low-maintenance outdoor space you can actually enjoy.
Key Takeaways
- Prioritize Polymeric Sand to Block Weeds: For the most effective and lasting weed prevention, choose polymeric sand. Its unique binders harden to form a solid, durable joint that locks out weeds and insects, a feature that standard jointing sand simply cannot offer.
- Correct Application Prevents Common Problems: Your results depend entirely on proper technique. Always begin with a completely clean and dry surface, sweep the sand to fill every joint completely, and activate it with a gentle mist of water to ensure a strong cure without stains.
- Perform Regular Upkeep for Lasting Results: Keep your paver joints strong with simple maintenance. Regularly sweep the surface to clear away debris where seeds can sprout, and inspect your joints annually to top off any low spots, reinforcing the protective barrier.
What Is Paver Sand and How Is It Different?
If you’ve ever admired a paver patio that looks perfectly pristine and weed-free, the secret isn’t magic, it’s the material used between the stones. The choice of sand for filling paver joints is a critical step that separates a low-maintenance outdoor space from one that requires constant weeding. While it might seem like any
The two main options are standard jointing sand and polymeric paver sand. While both will fill the gaps, only polymeric sand is engineered to create a durable, semi-solid joint that locks pavers together and blocks weeds from taking root. It’s more than just a filler; it’s an active part of your patio’s structure and defense system. Understanding what makes it so effective is the first step toward building a beautiful, lasting surface that you can enjoy without the extra work. This special sand is the key to preventing that frustrating cycle of pulling weeds from between your pavers every spring and summer, saving you time and keeping your outdoor living area looking its best.
Its Unique Composition and Binding Power
Think of polymeric paver sand as regular sand with a superpower. It’s a carefully blended mix of fine sand and special polymer binders. When dry, it sweeps into the joints just like normal sand. But when you introduce water, the magic happens. The polymers activate and harden, binding the sand particles together and to the sides of the pavers. This process, called curing, creates a firm yet flexible joint that feels almost like hard rubber. This solid bond locks your pavers in place, preventing them from shifting over time and creating a formidable barrier against weeds and burrowing insects.
Why Regular Sand Won’t Stop Weeds
So, why can’t you just use a bag of all-purpose sand to fill your paver joints? Regular sand is simply a filler. It has no binding agents, so it stays loose and granular forever. Every time it rains or you wash your patio, some of that sand gets washed away, leaving the joints partially empty. Weeds don’t typically grow from under your pavers; they grow when seeds from your lawn blow in and land in these empty gaps. Regular sand creates the perfect little garden bed for dandelions and crabgrass, turning your beautiful patio into a constant maintenance headache.
How Paver Sand Prevents Weed Growth
It’s frustrating to see stubborn weeds sprout up between the cracks of a beautiful paver patio or walkway you’ve worked so hard on. Fortunately, using the right kind of sand does more than just fill the gaps; it creates a powerful defense system. Paver sand, especially polymeric sand, works in a few key ways to keep your hardscape looking clean and pristine. It forms a physical shield, creates an environment where weeds can’t survive, and stands up to the elements to provide lasting protection.
It Creates a Solid Barrier
Think of polymeric sand as a flexible grout for your pavers. This special mix of sand and binding agents hardens when activated with water, creating a firm, solid joint. This process effectively locks your pavers together and forms an impenetrable barrier that weed seeds can’t get through. Unlike regular sand, which stays loose and can easily be displaced, this hardened surface prevents seeds from finding a cozy spot to settle and germinate. This solid seal also does a great job of deterring ants and other insects from making a home between your pavers. Getting the right sand delivery is the first step to building this defense.
It Blocks Sunlight and Nutrients
Weeds, like any other plant, need two basic things to grow: sunlight and nutrients. Paver sand is designed to deny them both. By completely filling the joints from bottom to top, the sand blocks sunlight from reaching any soil that might be lurking underneath. More importantly, the sand itself is sterile and contains no organic matter for weeds to feed on. It creates a barren environment where roots can’t take hold. While you want nutrient-rich black dirt for your garden beds, you want the exact opposite for your paver joints. This ensures that even the most persistent seeds have nothing to sustain them, stopping growth before it can even start.
It Resists Water and Washouts
Here in Minnesota, our patios and walkways face everything from heavy downpours to spring thaws. Regular sand easily washes out of paver joints during a storm, leaving gaps for weeds to invade. Polymeric sand, however, is built to last. Once the binders activate and the sand hardens, it becomes highly resistant to erosion from water and wind. This durable seal stays in place, ensuring the protective barrier remains intact season after season. This stability not only prevents weed growth but also helps keep your pavers from shifting, maintaining the integrity of your entire project. A solid foundation, like one made with Class 5 gravel, combined with strong joints, is the key to a long-lasting paver surface.
What Are Your Paver Sand Options?
When you walk down the aisle at a home improvement store, you’ll see that not all paver sands are the same. Choosing the right one is the most important step in creating a weed-free patio or walkway that lasts. The sand you select will determine how well your pavers are locked in place and how effectively they resist those pesky weeds that try to push through the cracks. Think of it as the glue that holds your entire project together and keeps it looking clean.
Your main choices come down to three types: polymeric sand, standard jointing sand, and sand with stabilizers. Each has a different composition and offers a different level of protection against weeds and erosion. Understanding the pros and cons of each will help you make the best decision for your project’s needs and your long-term maintenance goals. Let’s break down what makes each one unique so you can choose with confidence.
Polymeric Sand with Binders
Polymeric sand is a game-changer for paver projects. It’s a special blend of fine sand mixed with polymer binders. When you add water, these binders activate and harden, creating a firm, durable joint between your pavers. This solid barrier is tough for weeds to penetrate and also helps deter ants and other insects from making a home in the cracks. Because it hardens, polymeric sand is excellent at resisting erosion from rain and wind, so you won’t have to worry about it washing away and constantly reapplying it. It’s a fantastic choice if you’re looking for a low-maintenance, long-lasting solution.
Standard Jointing Sand
Standard jointing sand is essentially just fine, washed sand without any special additives. It’s the most basic option for filling the gaps between pavers. While it does the job of filling the space, it doesn’t offer much in the way of weed prevention. Since it doesn’t contain any binders, it never hardens. This means it can easily wash out during a heavy Minnesota downpour or get displaced by foot traffic, creating the perfect environment for weed seeds to settle in and sprout. If you need a basic filler, we offer reliable sand delivery for projects of any size, but for weed control, you’ll want something with more staying power.
Sand with Stabilizers
Sand with stabilizers is another excellent option that functions very similarly to polymeric sand. It’s also a type of jointing sand that includes additives designed to harden when activated with water. This process helps lock the pavers together tightly, creating a stable surface that stands up to the elements and foot traffic. Just like its polymeric cousin, the hardened surface forms a strong barrier that makes it difficult for weeds to grow through the joints. It’s a great alternative for achieving a durable, weed-resistant finish for your patio, walkway, or driveway, ensuring your hard work looks great for years to come.
Which Paver Sand Is Best for Weed Prevention?
When you’re trying to keep weeds out of your paver patio, the type of sand you choose for the joints makes all the difference. While standard jointing sand can fill the gaps, it doesn’t offer much of a defense against those stubborn weeds that seem to pop up overnight. For long-term weed prevention, the clear winner is polymeric sand. This isn’t just any sand; it’s a specially formulated product designed to create a durable, weed-resistant bond between your pavers. It’s the go-to choice for professionals and homeowners who want a low-maintenance, pristine finish that lasts. Let’s break down why it’s the top choice and how it compares to other options in terms of cost and effectiveness.
Why Polymeric Sand Is the Clear Winner
So, what makes polymeric sand so effective? It’s a unique mix of fine sand combined with special binders, or polymers. When you sweep this sand into the paver joints and lightly water it, a chemical reaction happens. The binders activate and harden, creating a firm, durable joint that’s almost like mortar. This solid barrier makes it incredibly difficult for weed seeds to find soil to germinate in. It also helps prevent insect infestations and stands up to rain without washing away, keeping your patio looking clean and tidy for years to come.
Comparing Cost vs. Effectiveness
Let’s talk about the budget. Polymeric sand does cost more upfront than regular jointing sand, and its application requires a bit more care. However, it’s an investment that pays off in the long run. Think of all the time and effort you’ll save by not having to pull weeds every weekend. Because it creates such a strong, long-lasting barrier, you won’t need to reapply it as often. Just remember, polymeric sand is strictly for the joints. For the base layer beneath your pavers, you’ll still need a proper bedding material, so plan for a separate sand delivery to ensure a level and stable surface.
How to Apply Paver Sand for the Best Results
Getting that perfect, weed-free finish on your patio or walkway comes down to proper application. It’s more than just dumping sand and hoping for the best; it’s a process that ensures every joint is filled correctly and the sand can form a solid, durable barrier. When you take the time to do it right, you’re setting your project up for long-term success and saving yourself from future weeding headaches.
Think of it in four simple stages: preparing the surface, applying the sand, activating it with water, and letting it cure. Each step is crucial for creating a tight seal that locks your pavers in place and keeps weeds out. Following these guidelines will help you achieve a professional-looking result that lasts for years, keeping your outdoor space beautiful and low-maintenance. Let’s walk through exactly how to get it done.
Prep and Clean Your Paver Surface
Before you even open a bag of sand, your pavers need to be completely clean and dry. Start by removing any old sand, dirt, or debris from the joints. A pressure washer on a medium setting works great for this, but be sure to wear eye protection. If you’re dealing with existing weeds, spray them with a quality weed killer a few days in advance to handle the roots. Once the joints are clear, give the entire paver surface a thorough cleaning to remove any remaining grime or stains. Let everything dry completely, as any moisture can prevent the new sand from settling and curing properly.
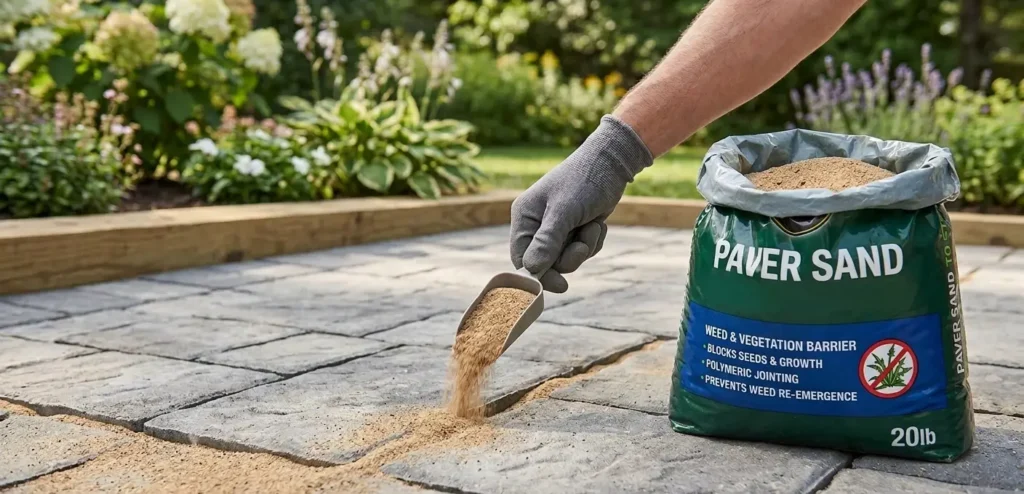
Apply and Sweep It In Correctly
Now for the main event. Once you have your sand delivery on-site, pour it directly onto the dry pavers. Using a stiff-bristled push broom, sweep the sand across the surface, working from different angles to guide it into every joint. Don’t rush this part. The goal is to fill the joints completely. To help the sand settle deep down, gently tap the pavers with the handle of your broom or a rubber mallet. For larger areas, a plate compactor does the job quickly. You may need to add a little more sand after compacting to ensure the joints are full.
Activate the Sand and Let It Cure
If you’re using polymeric sand, this step is what makes the magic happen. Activating the sand with water triggers the binders that harden and lock everything together. Set your hose nozzle to a gentle “shower” setting. Lightly spray a small section of your pavers at a time, allowing the water to soak into the joints. Continue misting until the sand is saturated and won’t absorb any more water. Be careful not to use a strong jet of water, as this can wash the sand out. If you see a milky white runoff, that’s your cue to stop watering that area, as you’re washing away the essential polymers.
Watch the Weather and Temperature
Your newly applied paver sand needs time to cure without interruption. Check the weather forecast before you start your project and aim for a few clear, dry days. A heavy downpour within the first 24 to 48 hours can wash the sand out of the joints before it has a chance to harden, undoing all your hard work. If unexpected rain is on the way, cover the area with a tarp. Temperature also plays a role. The sand will cure faster in warm, dry weather. Following the manufacturer’s instructions for temperature ranges will ensure the binders set correctly for a strong, lasting finish.
Can You Use Paver Sand on an Existing Patio?
Yes, you absolutely can! Applying new paver sand to an existing patio is a fantastic weekend project that can make your outdoor space look brand new again. It’s one of the best ways to tackle persistent weeds, fix wobbly pavers, and restore that clean, uniform look between the joints. Over time, the original sand washes away due to rain and general wear, leaving gaps where weeds can sprout and pavers can shift. Refreshing the sand fills these voids, re-stabilizing the entire surface and creating a strong barrier against unwanted growth.
The process isn’t as simple as just sprinkling new sand on top, though. To get the long-lasting, weed-free results you want, you’ll need to do a bit of prep work first. Think of it as giving your patio a fresh start. By properly cleaning out the old material and weeds, you create the perfect foundation for the new sand to lock in place and do its job. It’s a rewarding process that not only improves the look of your patio but also protects your investment for years to come by preventing shifting and weed damage. It’s a straightforward way to bring back that crisp, professional finish without having to redo the entire patio.
First, Get Rid of All the Weeds
Before you even think about opening a bag of sand, you need to deal with any existing weeds. If you have a serious weed problem, polymeric sand alone won’t solve it, as deep roots can eventually push through. A few days before you plan to work, treat the area with a strong weed killer to handle them at the source. Once they’re gone, it’s time to clear out the joints. Use a pressure washer or a sturdy tool to remove all the dead weeds, old sand, and any other debris. Your goal is to have clean, empty gaps between your pavers, ready for a fresh fill.
Prep Your Existing Pavers
With the joints cleared, the next step is to give the pavers themselves a thorough cleaning. This removes any dirt, grime, or moss, ensuring the sand doesn’t seal in any stains. After cleaning, the most important step is to let the pavers dry completely. I mean bone-dry, not just on the surface but all the way through. Applying paver sand to a damp surface is a recipe for a hazy, white residue that’s tough to remove. It’s best to wait at least 24 hours after a deep cleaning or a rain shower before you start spreading any sand. This patience will pay off with a clean, professional finish.
Apply Sand to Your Old Pavers
Once your patio is clean and completely dry, you’re ready for the fun part. If you’re not sure how much sand you’ll need, a cubic yardage calculator can help you estimate. Pour your paver sand onto the surface and use a push broom to sweep it into the joints. Work from multiple angles to make sure every gap is filled to the top. To help the sand settle, you can gently tap the pavers with a rubber mallet or use a plate compactor for larger areas. Sweep away any excess sand from the paver surfaces; a leaf blower on a low setting works great for a final touch. Finally, gently mist the area with a hose to activate the binders in the sand, letting it harden into a firm, weed-resistant barrier.
What Tools and Materials Will You Need?
Getting your paver project right means having the right tools on hand before you start. Gathering everything in advance will make the process smoother and help you get professional-looking results without any last-minute trips to the store. Think of it as setting up your workspace for success. Most of these items are common tools you might already have in your garage or shed, and the rest are easy to find. This simple preparation step ensures your project goes off without a hitch and you can stay focused on the task.
Your Equipment and Supply Checklist
To effectively fill your paver joints and lock out weeds, you’ll need a few key items. Your main material will be the paver sand itself, which you can have delivered right to your project site. You will also need a stiff-bristled broom to sweep the sand evenly into the cracks. For prep work, a leaf blower is great for clearing away leaves and loose debris from the paver surface. Finally, you’ll need a garden hose with an adjustable spray nozzle. This is crucial for gently misting the area to activate polymeric sand without washing it away. Having these tools ready will make the application process go smoothly.
Don’t Forget Your Safety Gear
Working with sand and power tools requires a few safety precautions. The dust from paver sand can be irritating, so wearing a dust mask is a smart move to protect your lungs. You will also want a good pair of work gloves to save your hands from scrapes and blisters. Most importantly, always wear eye protection. Whether you are using a leaf blower or a pressure washer to clean the pavers, debris can easily fly up toward your face. A simple pair of safety glasses will shield your eyes and prevent any serious injuries, letting you focus on getting the job done right.
How to Maintain Your Paver Sand
Putting down paver sand is a fantastic first step, but a little upkeep is what keeps your patio or walkway looking great and weed-free for the long haul. Think of it like any other part of your home; regular maintenance prevents small issues from turning into big headaches. By staying on top of a few simple tasks, you can ensure the sand in your paver joints continues to do its job effectively, protecting your investment and saving you from pulling weeds every weekend. These maintenance steps are straightforward and don’t require a lot of time, but they make a world of difference.
Inspect and Clean It Regularly
One of the easiest and most effective things you can do is keep your paver surface clean. Make it a habit to sweep your patio or walkway regularly with a stiff-bristled broom. This simple action clears away dirt, fallen leaves, and other debris that can break down and create a thin layer of soil on top of your paver sand. Weed seeds are opportunistic; they’ll happily take root in that debris. By sweeping them away before they have a chance to settle, you stop weed growth before it even starts. A quick rinse with a garden hose on a gentle setting can also help, but avoid using a high-pressure washer, which can blast the sand right out of the joints.
Know When to Add More Sand
Over time, natural elements like heavy rain and Minnesota’s freeze-thaw cycles can cause the sand in your paver joints to settle or wash away. It’s a good idea to inspect your pavers every spring to see how the sand held up over the winter. Look for joints where the sand level has dropped noticeably. If you see gaps forming, it’s time for a touch-up. Topping off the joints is crucial because empty spaces are an open invitation for weed seeds. Keeping the joints full and tight maintains the interlocking strength of your pavers and reinforces that weed-proof barrier. If you find your joints are looking a bit low, getting a fresh sand delivery is an easy way to get the material you need to refill them.
Consider Sealing for Extra Protection
If you want to give your paver sand an extra layer of defense, applying a sealer is a great option. A good quality paver sealer soaks into the sand and the pavers, hardening the surface and locking the sand particles in place. This makes it much harder for water to penetrate and wash the sand out, and it creates an even more formidable barrier against weeds. Sealers can also protect your pavers from stains and enhance their natural color, giving them a clean, finished look. If you’ve just applied new polymeric sand, be sure to let it cure completely for a few days before you apply any sealer.
Signs Your Sand Needs a Touch-Up
While paver sand is great for preventing weeds, it can’t solve underlying structural problems. If you notice that some of your pavers are wobbly, sinking, or becoming uneven, the issue is likely with the base material underneath, not the sand in the joints. Simply adding more sand to the gaps won’t fix a shifting paver. In this situation, you’ll need to carefully lift the unstable pavers, address the problem with the base (which may involve adding and re-leveling more gravel or sand), and then relay the pavers. Once the pavers are stable and level again, you can sweep fresh sand into the joints to finish the repair.
How Long Does Paver Sand Last?
Paver sand, especially the polymeric kind, is incredibly tough and designed to last for years. When installed correctly, you can expect it to hold up for a decade or more. However, its lifespan isn’t set in stone. Several factors, from Minnesota’s harsh weather to how you installed it, play a role in how long it will effectively keep weeds at bay. Think of it as a long-term solution that needs a little check-up now and then, not a permanent fix you can ignore forever. Understanding what affects its durability will help you get the most out of your investment and keep your patio or walkway looking great.
What Affects Its Lifespan
Polymeric sand is a game-changer because it’s a special mix of sand and additives that hardens when you wet it. This creates a firm, flexible joint that helps stop weeds from growing, keeps insects out, and won’t easily wash away in a heavy downpour. But its effectiveness depends heavily on proper installation. The gaps between your pavers need to be just right, typically between 1/4 inch and 1.5 inches wide. If they’re too tight, the sand can’t settle properly. Too wide, and it might not form a strong enough bond. Other factors like heavy foot traffic, drainage issues, and Minnesota’s freeze-thaw cycles can also wear it down over time. Starting with the right sand delivery and a solid base is your first step toward a long-lasting result.
When to Expect a Replacement
Even the best polymeric sand will need a refresh eventually. Over time, the sand between your pavers can settle, wear down, or wash away. A good rule of thumb is to inspect your paver joints annually and plan to re-sand them every few years or as needed. Look for signs like sand levels dropping low in the joints, weeds starting to pop through, or pavers feeling a bit loose. Topping off the sand keeps the joints full and tight, reinforcing that barrier against weeds. It’s a simple maintenance task that makes a huge difference in keeping your patio looking clean and professional for years to come. If you’re planning a touch-up, our cubic yardage calculator can help you figure out exactly how much sand you’ll need.
Common Mistakes That Weaken Paver Sand
You can choose the best paver sand on the market, but if it’s not applied or maintained correctly, it won’t be able to do its job. The application and aftercare process is just as important as the product itself. A few common missteps can easily compromise the sand’s binding power, leading to weak joints that invite weeds back in.
Fortunately, these errors are easy to avoid once you know what to look for. By sidestepping these common application and maintenance mistakes, you can ensure your paver sand forms a strong, durable barrier that keeps your patio or walkway looking clean and professional for years to come. Let’s cover the main things that can go wrong and how to get them right.
Application Errors to Avoid
Applying paver sand correctly from the start is your best defense against future problems. First, make sure your pavers are completely dry before you begin. Applying sand to a damp surface can trap moisture, which may cause the polymers to activate too early and create a hazy stain on your pavers. If you’re re-sanding an old patio, you’ll also need to remove all the old joint sand and debris. A pressure washer is a great tool for this, but be sure to let the pavers dry thoroughly afterward. Finally, check your joint spacing. Polymeric sand works best in gaps between 1/4 inch and 1.5 inches wide, as this gives it enough room to settle in and form a solid bond.
Maintenance Slip-Ups That Let Weeds In
Once your paver sand has cured, a little routine maintenance will keep it strong. The biggest mistake is letting dirt and organic debris build up on the surface. Sweeping your patio regularly removes the soil and seeds that weeds need to sprout. Over time, the sand in the joints can settle or wash out from rain and foot traffic. It’s important to inspect your joints every year and top them off as needed. When you need more material, getting fresh sand delivered makes the job quick and easy. You should also check for proper drainage. If water pools on your patio, it creates a damp environment where weeds and moss can thrive, so ensure your patio maintains a gentle slope to encourage water runoff.
Related Articles
- Sand Bulk Delivery: A Smart Buyer’s Guide – Minnesota Aggregates
- Where to Buy Sand in Bulk: A Buyer’s Guide – Minnesota Aggregates
Frequently Asked Questions
Why can’t I just use regular sand and spray for weeds later? While that might seem like an easier route, it creates a constant cycle of work for you. Regular sand easily washes out of the joints, creating the perfect little garden bed for new weed seeds to land in and sprout. Spraying only handles the weeds that are already there; it doesn’t prevent new ones. Polymeric sand is a preventative solution that creates a solid barrier to stop seeds from ever taking root, and it also locks your pavers together for better stability.
What happens if I use too much water on my new polymeric sand? Using too much water, or using a high-pressure stream, is one of the most common application mistakes. When you douse the sand, you can wash the essential polymer binders right out of the joints before they have a chance to activate and harden. This results in weak joints that won’t stand up to weeds or weather. It can also leave a stubborn, hazy white film on the surface of your pavers that is very difficult to clean off.
Is polymeric sand safe for my lawn and garden plants nearby? Yes, once it has fully cured, polymeric sand is inert and won’t harm your lawn, pets, or nearby garden plants. The key is to be careful during the application process. Before you add any water, make sure you sweep or blow all the excess dry sand off the paver surfaces, your grass, and any surrounding plant leaves. This prevents the sand from hardening where you don’t want it.
My polymeric sand didn’t harden correctly. What went wrong? If your sand is still soft or loose after a couple of days, a few things could be the cause. Most often, it’s a moisture issue. The pavers may not have been completely dry before you started, or an unexpected rain shower may have interrupted the curing process. It can also happen if the joints between your pavers are too narrow or too wide, which prevents the sand from compacting and bonding correctly.
How deep should the sand be in the paver joints? For the best results, the paver joints should be filled completely. This means the sand should go from the bedding layer all the way up to about 1/8th of an inch below the paver surface, or just below the little beveled edge on the paver. Filling the joints completely ensures a tight, secure lock between the pavers, provides maximum stability, and leaves no room for dirt and weed seeds to settle.