
When you walk into a landscape supply yard, it’s easy to think “sand is sand.” But for a paver project, that assumption can lead to a wobbly, uneven disaster. The fine, soft sand from a sandbox is completely different from the coarse, washed sand required for a stable paver base. The right sand has angular particles that interlock, creating a firm, unmoving bed for your pavers to rest on while allowing water to drain away freely. This guide will break down the differences, explaining why concrete sand is the hero of your base layer and why polymeric sand is your best friend for the joints. We’ll make sure you know exactly what to look for when you go to buy paver base sand MN.
Key Takeaways
- Not All Sand is Created Equal: For a stable paver base, you must use a coarse, angular sand like concrete sand. Its sharp particles interlock to create a firm bed that drains water effectively and prevents your pavers from shifting over time.
- Success Lies in the Layers: A long-lasting paver project requires a multi-layer foundation. This includes a compacted sub-base of soil, a thick layer of gravel aggregate, and a final, perfectly level one-inch layer of bedding sand directly under the pavers.
- Plan Your Purchase and Finishing Touches: Save money by buying sand in bulk and comparing supplier delivery fees for larger projects. Finish the job by using polymeric sand in the joints to lock pavers together, which prevents weeds and reduces long-term maintenance.
What Is Paver Base Sand?
If you’re planning a paver project, you’ve probably realized that the secret to a beautiful, long-lasting patio or walkway lies beneath the surface. Paver base sand is the critical layer that sits directly under your pavers. It’s specifically designed to provide a firm, level bed for the pavers to rest on, ensuring they don’t shift or settle over time. Think of it as the final puzzle piece in your base preparation that locks everything together.
This isn’t just any old sand from a sandbox. It’s a specific type of coarse, washed sand that allows for proper drainage and provides the stability your project needs. Getting the right sand delivery is a crucial step that prevents a lot of headaches down the road, from wobbly pavers to poor water drainage.
How It Differs from Regular Sand
It’s easy to think “sand is sand,” but for paver projects, that’s a costly mistake. Paver installation actually uses two main types of sand: a bedding sand that goes underneath the pavers and a jointing sand (like polymeric sand) that goes in between them. The bedding sand, often a coarse concrete sand, has angular particles that interlock to create a stable surface. This structure helps distribute pressure from foot traffic, vehicles, and Minnesota’s freeze-thaw cycles.
Regular sand, like fine masonry or play sand, has rounded particles that can shift and wash away easily. Using the wrong type will fail to provide the necessary support, leading to pavers that sink and become uneven. Professionals know that choosing the right material is essential for durability.
Why the Right Base Is Key for Minnesota Projects
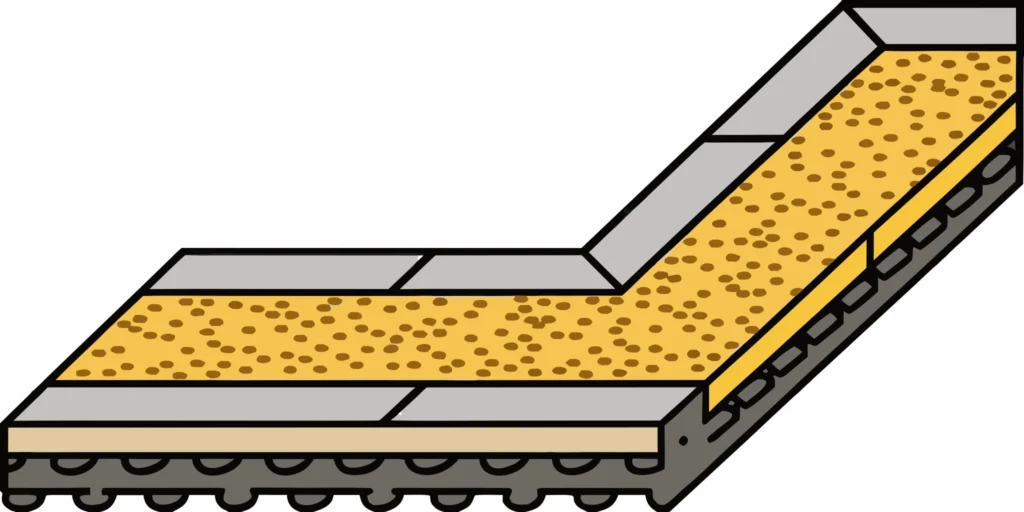
In Minnesota, our weather puts any outdoor project to the test. A solid base isn’t just recommended; it’s essential for your paver project to survive. A proper installation typically involves three layers: a compacted sub-base of soil, a layer of aggregate like Class 5 gravel, and then your one-inch layer of paver sand. This system is built for performance.
Without this layered foundation, especially the sand, pavers can quickly become a wobbly, uneven mess. They can sink, shift, and create tripping hazards. The right base ensures your patio or walkway stays level, drains water effectively, and can withstand years of use and harsh weather. Taking the time to build this foundation correctly means you’ll have a beautiful, functional space that lasts.
Common Types of Paver Base Sand
Walking into a supply yard and seeing piles of different sands can feel a little overwhelming. They aren’t all the same, and picking the right one is a critical step for a paver project that lasts. The sand you choose creates the stable, level bed your pavers rest on and helps lock them in place. Let’s break down the most common types you’ll encounter so you can choose with confidence.
Concrete Sand
Concrete sand is a coarse, gritty sand with angular particles. Think of it as the workhorse for paver bases. Because the grains are sharp and not rounded, they lock together tightly when compacted, creating an incredibly stable foundation. This type of sand is a key ingredient in concrete and is excellent for providing drainage, which is essential for preventing shifting and heaving during Minnesota’s freeze-thaw cycles. It’s screened and washed to remove fine silts and clays, ensuring water can pass through freely. For a strong, reliable base layer, concrete sand is almost always the right call.
Coarse/Washed Sand
Similar to concrete sand, coarse or washed sand has larger grains that are great for drainage. The term “washed” means it has been rinsed to remove dust, clay, and other fine particles that could otherwise hold water and cause problems down the line. This makes it a dependable choice for the bedding layer directly underneath your pavers. The American Society of Concrete Contractors highlights the importance of using washed sand for ensuring proper drainage and preventing erosion beneath your beautiful new patio or walkway. It provides a firm yet workable surface for setting your pavers perfectly level.
Mason Sand
Mason sand is much finer and smoother than concrete or coarse sand. Its fine texture makes it fantastic for creating a very smooth surface and for use in mortar for bricklaying. While some people use it as a paver base, its fine particles can sometimes hold more moisture and may not compact as firmly as coarser sands. However, it excels at filling gaps and can be used as the thin, final leveling layer (or bedding sand) right before you place the pavers. Its soft consistency makes it easy to screed into a perfectly flat plane for your pavers to sit on.
Polymeric Sand for Joints
This one is a bit different. Polymeric sand isn’t for the base; it’s for the final step of your project. You sweep this special sand into the joints between your pavers. It contains additives that, when mixed with water, create a powerful binder that hardens and locks the pavers together. This is your best defense against weeds and ant hills. According to the Interlocking Concrete Pavement Institute, it’s an excellent material for joint stabilization, as it resists erosion from rain and wind. Using polymeric sand gives your project a clean, professional finish and significantly reduces long-term maintenance.
How to Choose the Right Paver Base Sand
Picking the right sand for your paver base is a small detail that makes a huge difference. It’s not just about creating a level surface; it’s about building a foundation that can withstand Minnesota weather and daily use. The right sand provides stability, allows for proper drainage, and protects your investment from shifting. When you focus on a few key factors like grain size, drainage, and layer thickness, you can confidently select a material that ensures your patio, walkway, or driveway looks great and lasts a lifetime.
Check the Grain Size and Texture
The texture of your sand is everything. For a stable paver base, you need sand with coarse, angular grains that interlock to create a firm foundation. According to the pros at JPK Landscaping, you should always use “concrete sand, coarse sand, or paver sand, not playground sand.” Fine-grained sand, like playground or beach sand, is too smooth and rounded. The particles will shift and slide around, leading to uneven pavers and a wobbly surface over time. Coarse sand, on the other hand, compacts tightly to form a solid bedding layer that holds your pavers securely in place. When you’re ready to buy sand, make sure you’re getting a coarse, washed variety designed for construction.
Ensure Proper Drainage
One of the most important jobs of the sand layer is to help water move away from your pavers. If water gets trapped, it can cause a whole host of problems, from moss growth to erosion of the base materials. As experts point out, proper sand improves water drainage under the patio, which prevents puddles and keeps the ground from washing away. This is especially important in Minnesota, where we get our fair share of rain and snowmelt. A well-draining base ensures that water passes through the joints and sand layer into the gravel below, keeping your paver surface dry, stable, and looking its best.
Handle Minnesota’s Freeze-Thaw Cycle
If you’ve lived through a Minnesota winter, you know all about the freeze-thaw cycle. As the ground freezes and thaws, it expands and contracts, causing the ground to heave. This movement can wreak havoc on a poorly installed paver project, leading to shifting, cracking, and an uneven surface. The right type of sand is your first line of defense. A base made with coarse concrete sand helps spread out pressure from foot traffic and, more importantly, from weather changes like freezing and thawing. This flexibility allows the entire paver system to move as a single unit, minimizing the impact of ground movement and keeping your pavers level for years.
Get the Layer Thickness Right for a Stable Base
Your paver base is a layered system, and each layer has a specific job. A professional installation typically includes “a packed dirt layer (sub-base), a crushed stone layer, and a sand layer.” The sand is the final bedding layer that goes directly under the pavers. Its purpose is to provide a thin, smooth cushion that makes it easy to set the pavers level. For this layer, consistency is key. You should aim for a uniform thickness of exactly one inch. Any thicker, and you risk the pavers shifting over time. Any thinner, and you won’t have enough material to properly level them. Before you order, be sure to calculate how much material you’ll need for that perfect one-inch layer.
How Much Paver Base Sand Do You Need?
Okay, let’s talk numbers. Nothing is more frustrating than running out of material midway through a project or, almost as bad, having a giant pile of leftover sand sitting in your driveway. Getting the quantity right from the start saves you time, money, and a major headache. The good news is that figuring out how much paver base sand you need is pretty straightforward with a little bit of planning.
Calculate Your Project’s Coverage
Before you can even think about ordering, you need to know exactly how much space you’re filling. The key is to calculate the volume of your project area in cubic yards. To do this, you’ll measure the length and width of your paver area in feet, then multiply that by the depth of the sand layer (also in feet). If math isn’t your favorite subject, don’t worry. We have a handy cubic yardage calculator to do the heavy lifting for you. Many local suppliers agree that using a calculator is the best approach; for example, Gertens recommends using their online tools to determine the right amount of rock or sand. This simple step ensures you buy what you need without the waste.
Typical Costs for Paver Base Sand in Minnesota
Once you know how much sand you need, the next question is always about the budget. In Minnesota, the cost of paver base sand can vary quite a bit. It depends on the specific type of sand you choose, the quantity you’re buying, and the supplier. Companies like Hassan Sand & Gravel, Inc. offer a huge range of sand and gravel products, so you can find the right fit for your project’s specific needs. Other suppliers, such as Pine Products, provide detailed price lists that are great for planning your budget ahead of time. When comparing prices, always remember to factor in delivery fees to get the true total cost for your project.
Where to Buy Paver Base Sand in Minnesota
Once you know what type of paver base sand you need, the next step is finding a reliable place to buy it. In Minnesota, you have several great options, each with its own set of benefits depending on your project’s size and your personal preference. You can go directly to an aggregate supplier for bulk deliveries, visit a local landscape supply store for expert advice and a hands-on look at materials, or swing by a big box home improvement store for convenience on smaller jobs.
Choosing the right supplier is just as important as choosing the right sand. A good supplier ensures you get high-quality, consistent material that will help your paver project last for years. Think about factors like delivery options, cost per yard, and customer service. For large-scale projects like a new driveway or patio, a direct supplier who can deliver in bulk is often the most cost-effective and efficient choice. For smaller garden paths or repairs, a local store might be all you need. We’ll walk through each of these options so you can find the perfect fit for your project.
Minnesota Aggregates
For a straightforward, no-fuss experience, going directly to an aggregate supplier is your best bet. At Minnesota Aggregates, we specialize in providing high-quality materials with fast, on-time delivery across the state. Our sand delivery service ensures you get the right material for a solid paver foundation, brought directly to your job site. This saves you the time and hassle of hauling multiple bags from a store.
We make planning easy, too. If you’re not sure how much sand your project requires, you can use our handy cubic yardage calculator to get an accurate estimate. This helps you order the right amount, avoiding waste and extra costs. For contractors and homeowners who value reliability and quality, we’re here to make sure your project starts on the right foot.
Local Landscape Supply Stores
Local landscape supply stores are another fantastic resource, especially if you appreciate personalized service and expert advice. These shops are staffed by people who know the ins and outs of local landscaping challenges and can guide you to the best materials for your specific needs. Places like Gertens offer a wide variety of bulk landscaping materials, including different types of sand perfect for paver bases.
Visiting a local supplier allows you to see the sand and other materials in person, which can be helpful when you’re trying to match colors or textures. They can also be a one-stop shop for other project needs, like pavers, edging, and polymeric sand. If you’re tackling a DIY project for the first time, the guidance you can get from a local expert is invaluable.
Big Box Home Improvement Stores
For convenience, especially for smaller projects or quick repairs, you can’t beat big box home improvement stores. Retailers like Home Depot and Lowe’s typically stock bags of all-purpose or paver sand that you can pick up on the same day. This is a great option if you only need a small amount of material for a garden walkway or to top off an existing base.
While convenient, buying sand in bags can get expensive for larger projects. For anything more than a small patio, you’ll likely find better value with a bulk supplier. Some regional suppliers, like Pine Products, bridge the gap by offering bulk materials and delivery services, giving you another excellent option to compare for your project needs.
How to Save Money on Paver Base Sand
A beautiful paver patio or walkway is a fantastic investment in your home, but material costs can add up quickly. The good news is that with a little bit of planning, you can get the high-quality paver base sand you need without overspending. It’s all about working smarter, not harder, to find the best value for your project. Here are a few practical tips to help you save money on your paver base materials.
Buy in Bulk
If your project is anything larger than a tiny patch repair, buying your paver sand in bulk is almost always the most economical choice. While grabbing a few bags from a big-box store is fine for small jobs, the cost per cubic foot is significantly higher than buying by the truckload. For patios, walkways, or driveways, bulk delivery is the way to go. You’ll not only save money on the material itself but also save yourself the time and effort of hauling dozens of heavy bags. To make sure you order the right amount, you can use a calculator to determine your exact needs before placing an order.
Compare Suppliers and Delivery Options
When you’re shopping for paver sand, don’t just look at the price per ton. Delivery fees can vary widely between suppliers and can have a big impact on your total cost. Take some time to get quotes from a few local companies. Ask about their delivery fees and scheduling policies. A supplier with slightly more expensive sand but a lower delivery fee and a reputation for on-time service might be the better deal in the long run. Reliable sand delivery means your project stays on track, saving you from costly delays and headaches. Doing this homework upfront ensures you find the best overall value.
Look for Seasonal Deals
The timing of your project can also influence your costs. Landscaping and construction have peak seasons, typically in the spring and summer. If you can plan your paver installation for the shoulder seasons, like early spring or late fall, you might find better pricing. During these slower times, suppliers are often looking to keep their materials moving and their crews busy. It’s always a good idea to check a supplier’s website or call them directly to ask about any current promotions or off-season rates. Planning ahead can lead to significant savings on all your base materials, including essentials like Class 5 gravel.
Pro Tips for a Lasting Paver Installation
Putting in the work upfront ensures your paver patio, walkway, or driveway looks great and lasts for years. A solid installation prevents common issues like sinking, shifting, and weed growth. By following a few professional tips, you can create a durable, beautiful surface that stands up to Minnesota weather and daily use. From preparing the base correctly to performing simple maintenance, these steps will help you get the most out of your project.
Avoid These Common Installation Mistakes
When you’re in the middle of a big project, it’s tempting to look for shortcuts. However, skipping a crucial step like adding a sand layer can cause major headaches later. Without a proper sand base, pavers can shift, sink, or become uneven, creating a wobbly and unsafe surface. What might seem like a time-saver now can quickly turn into a costly repair down the road.
Taking the time to install each layer correctly is the best way to protect your investment. A proper base provides the stability your pavers need to stay put. Getting the right materials is the first step, so make sure you have a quality bedding sand ready before you begin laying pavers. A reliable sand delivery service can ensure you have what you need, right when you need it.
Prepare and Layer Your Base Materials Correctly
A professional paver installation relies on a multi-layer base. Start with a compacted sub-base, which is your native soil. On top of that, add a 4 to 6-inch layer of crushed stone or gravel, like Class 5, and compact it thoroughly. This layer is essential for drainage and structural support. You can use our Cubic Yardage Calculator to figure out exactly how much material your project requires.
Finally, spread a 1-inch layer of bedding sand over the gravel base. This is the layer your pavers will sit on directly. Use coarse concrete sand or a similar paver sand, not fine playground sand, as it provides better stability and drainage. This sand layer helps lock the pavers in place and creates a smooth, even surface.
Account for Minnesota’s Freeze-Thaw Cycles
In Minnesota, we know that winter weather can be tough on outdoor projects. The constant freezing and thawing can cause the ground to shift, which is a major threat to paver installations. Using the right type of sand is your best defense. Coarse sand helps distribute pressure from foot traffic and weather changes, allowing for slight movement without causing pavers to heave or crack.
If your yard has heavy clay soil, you need to be extra careful. Clay holds water and expands or shrinks dramatically with temperature changes. Ensure your base has excellent drainage and that you compact the ground thoroughly to minimize water retention. A properly installed base using quality Class 5 delivery materials will help your project withstand our challenging climate for years to come.
Maintain Your Pavers After Installation
Once your pavers are laid, the final step is to fill the joints. Polymeric sand is an excellent choice for this. It’s a special mix that hardens to lock pavers together, which helps prevent weed growth and insect infestations between the cracks. After sweeping the sand into the joints, a light mist of water activates the polymers and creates a firm, durable bond.
After the polymeric sand has fully cured, consider applying a paver sealer. Sealing is a great way to protect your pavers from stains, UV rays, and moisture. It also enhances their color and makes them easier to clean. This final touch not only helps the pavers last longer but also keeps your patio or walkway looking its best. You can find great instructions on how to apply polymeric sand to make sure the job is done right.
Related Articles
- What Type of Sand for Paver Base? A Pro Guide – Minnesota Aggregates
- How to Use Paver Sand to Stop Weeds: A Pro Guide – Minnesota Aggregates
- How to Buy Mason Sand by the Yard: A Simple Guide – Minnesota Aggregates
Frequently Asked Questions
Can I just use regular play sand for my paver base? It’s a common question, but using play sand is a mistake that can ruin your project. Play sand has fine, rounded grains that shift and slide around, much like sand at the beach. It won’t compact into a firm surface. For a stable base, you need a coarse, angular sand (like concrete sand) whose particles lock together tightly. This creates the solid foundation your pavers need to stay level and not wobble over time.
What’s the difference between the sand under my pavers and the sand between them? They serve two completely different purposes. The sand that goes under your pavers is a coarse bedding sand, which creates a one-inch cushion for leveling and setting the pavers. The sand that goes between the pavers is a jointing sand. We recommend using polymeric sand for this, as it contains special additives that harden when wet. This locks the pavers together, prevents weeds, and keeps insects from digging through the joints.
Is the one-inch sand layer really that important? Yes, it’s absolutely critical, and the one-inch depth is very specific. This layer isn’t meant to build height; its job is to provide a firm, smooth bed that allows you to set each paver perfectly level. If you make the layer too thick, the pavers are more likely to shift and settle over time. If it’s too thin, you won’t have enough material to make those fine adjustments, resulting in an uneven surface.
How do I decide between buying sand in bags or getting a bulk delivery? The best choice really depends on the size of your project. If you are doing a very small repair or building a tiny garden path, buying a few bags from a home improvement store can be convenient. For any project the size of a patio, walkway, or driveway, ordering a bulk delivery is far more cost-effective and saves you the back-breaking work of hauling dozens of heavy bags.
My yard has heavy clay soil. Do I need to do anything differently? Yes, you should take extra care if you have clay soil. Clay holds a lot of water and is very susceptible to heaving during Minnesota’s freeze-thaw cycles. To counter this, you must ensure your base has excellent drainage. This usually means digging a deeper foundation and installing a thicker, well-compacted layer of aggregate, like Class 5 gravel, beneath your one-inch sand layer. This strong foundation will help manage water and provide the stability your pavers need to survive our tough winters.