Nothing is more satisfying than seeing a dramatic home improvement project come to life. While a kitchen remodel gets a lot of attention, fixing your yard’s slope offers one of the most impactful changes you can make. A lumpy, puddled lawn can become a smooth, green canvas, and the peace of mind that comes with it is priceless. This is about more than just aesthetics; it’s about function. Proper grading solves drainage issues at their source. We’ll cover everything you need to know to get the job done right, from planning your slope to documenting your progress for an amazing yard grading before and after reveal that protects your home’s foundation.
Key Takeaways
- Shape your yard to protect your foundation: The main goal of grading is to create a gentle slope that moves water away from your house. This is the most effective way to prevent a wet basement, protect your home’s structure, and stop soil erosion before it starts.
- Aim for a gradual, consistent slope: You don’t need a steep hill; a drop of about two to three inches for every 10 feet away from your home is enough to guide water effectively. Use simple tools like stakes and a string level to measure your progress and ensure the grade is even.
- Prioritize safety and quality materials for lasting results: Before digging, always call 811 to locate underground utility lines. When adding soil, choose high-quality fill material to prevent future settling and ensure your hard work creates a stable, long-lasting solution.
What Is Yard Grading and Why Is It So Important?
Yard grading is the process of shaping the land around your home to control the flow of water. It might not sound as exciting as picking out plants for a new garden, but it’s one of the most critical steps for ensuring your property stays healthy and stable for years to come. The main goal is to create a gentle slope that directs rainwater and snowmelt away from your house, preventing a whole host of expensive and frustrating problems.
Proper grading is your first line of defense against water damage. It protects your foundation, keeps your basement dry, and prevents soil erosion that can ruin your landscaping. When your yard is graded correctly, water has a clear path to follow, moving harmlessly toward a street drain or another part of your yard designed to handle it. Without that slope, water can sit against your home, seeping into places it doesn’t belong. Whether you’re building a new patio, fixing a soggy lawn, or just trying to solve a mysterious leak in your basement, understanding the basics of yard grading is essential. It’s about working with nature, not against it, to create a safe and solid base for your home and yard.
Create a Solid Foundation for Drainage
The number one reason for grading your yard is to make sure water flows away from your house. When your yard slopes toward your foundation, it’s like creating a small moat that invites water to pool right where you don’t want it. This standing water can easily lead to a flooded basement, persistent leaks, and a damp, musty environment that’s hard to get rid of. By reshaping the slope, you create a clear path for water to follow, guiding it toward the street or a designated drainage area. This simple act of resloping is fundamental to preventing water from collecting near your home’s foundation and causing damage.
Protect Your Home’s Structure
Many homeowners in Minnesota deal with basement water issues, and the culprit is often improper yard grading. Water that constantly soaks the ground around your foundation can exert immense pressure on the walls, leading to cracks and bowing over time. This moisture also causes the soil to expand and contract with freezing and thawing, which can shift the foundation and lead to significant structural damage. Water should always flow away from your home, not toward it. Correcting the slope is a proactive step to protect your home’s structural integrity and avoid costly repairs down the road. Before you start adding fill, you can use a cubic yardage calculator to estimate how much material you’ll need for the job.
Telltale Signs Your Yard Needs Grading
Not sure if your yard needs a makeover? Your property will often give you clear signals when the slope isn’t working. Paying attention to these signs can help you address drainage problems before they turn into expensive repairs. From persistent puddles to foundation issues, these clues indicate it’s time to consider grading.
Correcting your yard’s slope is one of the most effective ways to protect your home and create a healthier, more usable outdoor space. Let’s walk through the most common red flags that show your yard is calling for help.
Water Pooling Near Your Foundation
If you notice water collecting against your house after it rains, that’s a major warning sign. Your yard should always slope away from your home’s foundation to direct water safely away. When the ground tilts inward, it channels rain and snowmelt directly toward your foundation walls. This can lead to basement leaks, water damage, and even long-term structural problems. Many homeowners face frustrating and potentially costly basement water issues caused by improper yard grading. A simple visual check after the next downpour can tell you if your slope is putting your home at risk.
Uneven Ground and Low Spots
Does your yard look lumpy or have noticeable dips and valleys? These low spots are more than just an eyesore; they’re prime locations for standing water. Grading is the process of shaping your yard to create a smooth, consistent slope that allows water to flow away from your home and other structures. If you have areas that are constantly soggy or where the grass struggles to grow, it’s likely due to poor grading. Our professional skid steer services can help reshape these problem areas, creating an even surface that drains properly and improves the overall health of your lawn.
Soil Erosion and Washouts
Have you spotted bare patches where soil has washed away or small gullies forming on a slope? That’s a classic sign of soil erosion. When a yard isn’t graded correctly, rainwater can gain momentum and strip away valuable topsoil, leaving your lawn’s root system exposed and vulnerable. This not only damages your grass but can also carry away mulch from garden beds and deposit sediment on your driveway or sidewalk. After regrading, you can replenish the area with nutrient-rich topsoil by scheduling a black dirt delivery to give your lawn a fresh, healthy start.
Puddles Lingering After It Rains
It’s normal for a yard to be wet after a storm, but if you have puddles that stick around for a day or more, you have a drainage problem. Standing water from improper lawn grading can kill your grass, create a muddy mess, and become a breeding ground for mosquitoes and other pests. These swampy spots make it difficult to mow the lawn or let your kids and pets play outside. Fixing the grade will eliminate these lingering puddles by ensuring water has a clear path to run off your property, leaving you with a dry and functional yard.
Gather Your Tools and Materials
Before you can break ground, it’s important to get organized. Having the right equipment and materials ready to go will make the entire grading process smoother and more efficient. Whether you’re tackling a small dip in the lawn or a major overhaul of your property’s slope, preparation is the key to getting the results you want. Let’s walk through what you’ll need to have on hand.
Essential Hand Tools for the Job
For smaller DIY grading projects, you can accomplish a lot with some basic hand tools. You don’t need a massive fleet of machinery to fix a few low spots. To start, gather two wooden stakes, a carpenter’s level, and about 12 feet of string to help you measure the slope accurately. You’ll also want a measuring tape for precise calculations. To do the actual work of moving soil, make sure you have a sturdy shovel, a garden hoe, and a wide landscape rake. These simple tools are perfect for moving and smoothing the soil to create an even surface.
When to Call in Heavy Equipment
If your project involves moving a large volume of dirt or correcting a steep, complicated slope, it’s probably time to think bigger than a shovel. For extensive grading, calling in a professional is your best bet. An improper grade can lead to serious drainage problems and even damage your home’s foundation, so it’s not a place to cut corners. Professionals use heavy machinery to get the job done efficiently and correctly. Our team offers expert skid steer services to handle the heavy lifting, ensuring your yard is scraped, leveled, and properly prepared for the next step.
How to Choose the Right Fill Materials
When you need to fill in low spots, not just any dirt will do. The quality of your fill material directly impacts drainage and how well your grass or plants will grow later. Instead of using dense, clumpy dirt from another part of your yard, consider a high-quality screened topsoil. We recommend our premium Black Dirt delivery service, which provides nutrient-rich soil that’s easy to work with and promotes a healthy landscape. If you’re unsure how much material your project requires, our handy cubic yardage calculator can help you get an accurate estimate.
Your Step-by-Step Guide to Grading a Yard
Ready to get your hands dirty? Grading your yard might seem like a huge project, but breaking it down into simple steps makes it completely manageable. Whether you’re tackling a small low spot or reshaping your entire lawn, this guide will walk you through the process from start to finish. With a solid plan and the right approach, you can solve your drainage problems and create a healthier, more functional outdoor space.
Step 1: Assess Your Current Slope
Before you move a single shovel of dirt, you need to understand what you’re working with. Take a walk around your property, especially after a rainstorm, to see where water naturally goes. Look for low spots where puddles form and high spots that might be diverting water toward your house. You can use stakes and a string level to get a more precise measurement of the slope. This initial assessment is your roadmap; it tells you exactly where soil needs to be removed and where it needs to be added to guide water away from your foundation.
Step 2: Map Out Your Grading Plan
Now that you know your yard’s trouble spots, it’s time to make a plan. Start by calling 811 to have any underground utility lines marked. The last thing you want is to accidentally hit a pipe or cable. Next, sketch out your yard and mark the high and low areas. Decide where you want water to flow, which should always be away from your home and toward a street or drainage area. This is also the time to figure out if you’ll need to bring in extra fill material. Our handy cubic yardage calculator can help you estimate how much you’ll need.
Step 3: Excavate and Move the Soil
This is where the real work begins. Start by removing soil from the high points you identified and moving it to the low points, especially any areas near your foundation. For smaller jobs, a shovel and wheelbarrow will do the trick. If you’re dealing with a larger area or need to move a lot of dirt, renting equipment or hiring professional skid steer services can save you a lot of time and back pain. If you don’t have enough existing soil, you can have quality fill materials like topsoil or sand delivered to build up the low spots.
Step 4: Create the Proper Grade
The main goal here is to create a gentle, consistent slope that directs water away from your house. You don’t need a steep hill; a drop of about two to three inches for every 10 feet of distance from your foundation is usually enough. Use a rake to spread the soil evenly, checking your slope frequently with your stakes and string level. If you’re building up a larger area, you might use a base layer of Class 5 gravel for stability before adding topsoil. Keep working the soil until you have a smooth, gradual grade across the entire area.
Step 5: Smooth and Compact the Surface
Once you’re happy with the slope, the final step is to compact the soil. This prevents the dirt from settling over time and creating new low spots. You can walk on a large piece of plywood to distribute your weight or use a lawn roller or hand tamper for a more compact finish. After compacting, you can add a final layer of high-quality black dirt to prepare the area for seeding or sod. A smooth, properly compacted surface is the key to ensuring your hard work lasts for years to come.
What Does a Properly Graded Yard Look Like?
After all the hard work, what’s the final result you’re looking for? A properly graded yard isn’t just about moving dirt around; it’s about creating a landscape that is both beautiful and functional. Visually, it should look smooth and intentional, without any jarring dips or unexpected hills. The lawn should appear uniform, providing a perfect canvas for landscaping, gardens, or a play area.
Functionally, a well-graded yard is your home’s first line of defense against water damage. It directs rainwater and snowmelt safely away from your foundation, preventing costly issues down the road. Every slope and contour serves a purpose, working together to manage water flow effectively. When you look at a finished project, you should see a seamless transition from your home to the rest of your property, where water has clear, safe paths to follow. It’s a subtle but powerful feature that protects your investment and gives you peace of mind every time it rains.
The Ideal Slope Away From Your House
The most critical part of any grading project is the area immediately surrounding your home’s foundation. A properly graded yard should have a gentle, consistent slope that drops away from the house. The standard rule of thumb is a drop of at least one inch for every foot you move away from the foundation, extending for a minimum of five to ten feet.
This slope is often so gradual that you might not even notice it, but it’s essential for guiding water away from your basement and crawl spaces. Creating this grade ensures that water doesn’t have a chance to pool against your foundation, which can lead to leaks, cracks, and other serious structural problems. It’s a non-negotiable feature for a healthy, dry home.
A Smooth, Even Surface
Beyond the initial slope away from your foundation, the rest of your yard should have a smooth, even surface. This means eliminating any low spots, ruts, or depressions where water can collect and form puddles. A uniform surface not only looks more attractive but also ensures that water continues its journey away from your property without getting trapped. Achieving this often requires bringing in quality fill material.
Using high-quality black dirt can help you create a nutrient-rich, level surface perfect for growing a lush lawn. For larger projects, professional skid steer services can make quick work of spreading and smoothing the material, giving you a professional finish that’s difficult to achieve by hand. The end goal is a clean, consistent landscape that’s ready for seeding or sod.
Clear Pathways for Water Runoff
A properly graded yard thinks about the entire journey of water, from the moment it hits your property to the moment it leaves. It’s not enough to just push water away from the house; you need to give it a clear and controlled path to follow. This prevents it from causing erosion or flooding other areas of your yard or your neighbor’s property.
These pathways can be subtle, like a wide, shallow channel known as a swale, that guides water toward a street drain or a designated runoff area. In some cases, you might build these channels using durable materials like Class 5 gravel to create a stable, erosion-resistant path. By understanding how water naturally flows, you can design a system that works with gravity to protect your entire landscape.
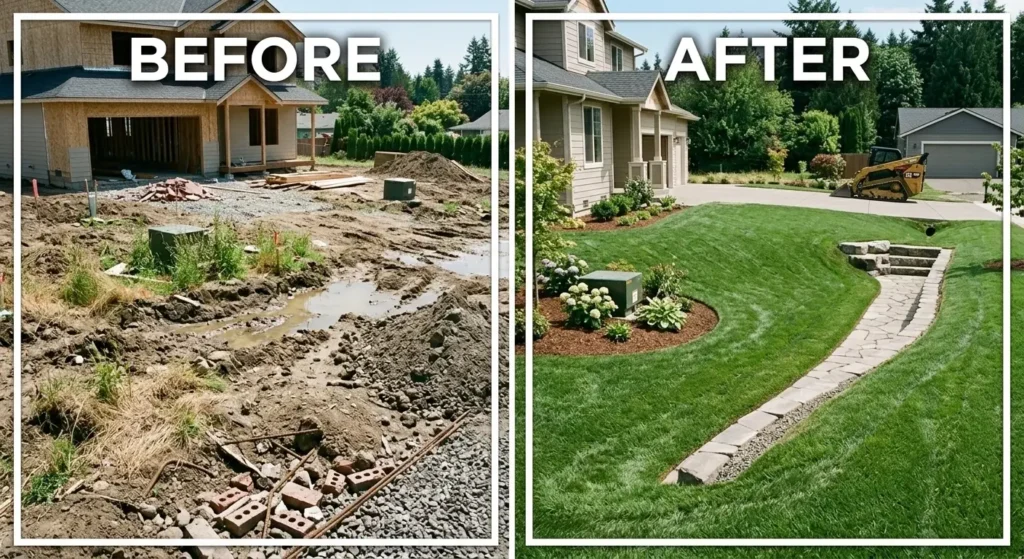
How to Document Your Project with Photos
Documenting your yard grading project is one of the most satisfying parts of the process. It’s easy to forget what your yard looked like once the work is done, so having photos creates a visual record of your hard work. Plus, who doesn’t love a dramatic before-and-after reveal? Here’s how to capture the transformation from start to finish.
Take Clear “Before” Pictures
Before you move a single shovel of dirt, grab your phone or camera. Taking clear “before” pictures is the crucial first step. Try to shoot on a bright, overcast day to avoid harsh shadows. Walk around your property and capture every angle, paying special attention to the problem spots like areas where water pools or the ground is noticeably uneven. These initial photos set the stage for the entire story. A great “before” shot is what makes the “after” photo so impactful, clearly defining the beautiful solution you’ve created for your home.
Capture Your Progress
Don’t just wait for the final result to take more pictures. Documenting the project as it unfolds helps you appreciate each stage of the transformation. Snap a few photos after you’ve cleared the area, once the new fill material like black dirt has been delivered, and after you’ve spread and compacted it. These in-between shots create a visual timeline and can be a great source of motivation. They also provide helpful inspiration for Yard grading before and after projects if you ever decide to share your journey with others.
Showcase the Final “After” Results
This is the moment you’ve been waiting for. Once the grading is complete and your yard is looking pristine, it’s time for the “after” shots. For the best results, try to replicate the same angles and lighting conditions from your “before” pictures. This makes the comparison much more dramatic. If you’re planting grass, you might even wait a few weeks for it to start growing in. There’s nothing quite like the satisfaction of seeing the finished pictures, and you’ll be glad you have a complete photo record to look back on.
Create Powerful Side-by-Side Comparisons
The best way to showcase your hard work is with a side-by-side comparison. You can use a free photo editing app on your phone or computer to place your “before” and “after” images next to each other. This single image tells the whole story at a glance, highlighting the dramatic change in your landscape. It’s a powerful visual that truly captures the scope of the project. Seeing the two images together provides a compelling look at Land grading before and after results and gives you something to be proud of for years to come.
What Drainage Solutions Pair Best with Grading?
Think of yard grading as creating the perfect foundation for water management. It establishes the main pathways for water to follow, but sometimes, your property needs a little extra help to handle heavy rain or persistent wet spots. Pairing your new grade with a dedicated drainage system creates a powerful combination that keeps your yard dry and your foundation safe. These solutions work hand-in-hand with the slope you’ve created, capturing and redirecting water exactly where it needs to go. By integrating a drainage system, you’re not just moving water, you’re actively managing it for the long-term health of your landscape.
French Drains and Underground Pipes
If you have areas with particularly poor drainage, a French drain is a fantastic, hardworking solution. This system is essentially a hidden trench containing a perforated pipe surrounded by gravel. Grading directs surface water toward the drain, where it seeps through the gravel and into the pipe. The pipe then carries the water away to a safe discharge point, like a storm drain or a dry well. Installing one requires digging a trench, which is where professional skid steer services can save you a lot of time and effort. A well-planned French drain system ensures your yard stays functional and dry, even after a classic Minnesota downpour.
Swales and Rain Gardens
For a more natural approach that integrates beautifully into your landscape, consider swales or rain gardens. A swale is a shallow, broad channel with gentle side slopes that helps slow and direct runoff. A rain garden is a shallow depression planted with native, water-loving plants. Grading is crucial for both, as it shapes the land to guide water into these features. Instead of just whisking water away, these solutions capture it, allowing it to slowly soak into the ground. This helps recharge groundwater and filter pollutants. Using quality black dirt in your rain garden will give your plants the perfect medium to thrive and absorb that excess water.
Common Yard Grading Mistakes to Avoid
Yard grading can feel like a huge undertaking, but knowing what not to do is just as important as knowing the right steps. Getting it right the first time saves you from costly repairs and the frustration of redoing your work. By steering clear of a few common errors, you can ensure your project is a success and that your yard will drain properly for years to come. These mistakes are surprisingly easy to make, but thankfully, they are also easy to avoid with a little planning and the right approach. Let’s walk through the biggest pitfalls so you can tackle your grading project with confidence.
Creating an Improper Slope
This is the most critical mistake you can make. The entire point of grading is to direct water, so creating the wrong slope defeats the purpose. Water should always flow away from your home’s foundation, not toward it. A negative grade, where the ground slopes back toward your house, is a recipe for disaster. It can lead to a wet basement, foundation cracks, and serious structural damage over time. Always double-check your measurements to ensure you have a consistent, gentle slope that guides rainwater to a safe runoff point, like the street or a drainage swale.
Using Low-Quality Fill Materials
When you need to build up low spots, it can be tempting to use whatever fill is cheapest or most convenient. However, using low-quality materials can cause major headaches down the road. Poor fill, like soil full of rocks, debris, or organic matter that will decompose, leads to settling and drainage issues. As the material breaks down or compacts unevenly, you’ll end up with new dips and puddles. It’s essential to use appropriate materials that support the landscape. Using a stable base like Class 5 gravel or finishing with nutrient-rich black dirt will give you a stable, long-lasting result.
Forgetting About Underground Utilities
Before you move a single shovelful of dirt, you absolutely must know what’s buried beneath the surface. Failing to check for underground utilities is a dangerous and expensive mistake. Hitting a gas line, water pipe, or electrical cable can cause serious injury and lead to costly repairs and service outages. The good news is that this is the easiest mistake to avoid. Simply call 811 a few days before you plan to start your project. This free national service will send someone to mark the approximate location of any buried utility lines on your property, so you can dig safely.
How Much Does Yard Grading Cost?
Figuring out the budget for a yard grading project is a top priority for most homeowners and contractors. The final cost can vary quite a bit, depending on the size of your yard, the complexity of the job, and whether you decide to tackle it yourself or bring in a professional. A small, relatively flat area might be a simple weekend project, while a large, steeply sloped yard will require a more significant investment.
The total price tag includes more than just moving dirt. You’ll need to account for labor, equipment rentals, and the cost of any fill materials needed to achieve the perfect slope. Understanding these factors will help you create a realistic budget and decide on the best approach for your property.
DIY vs. Professional Grading Costs
Taking the do-it-yourself route can be a great way to save on labor costs, especially for smaller grading jobs. Your main expenses will be renting equipment and purchasing materials. For instance, you might need to rent a skid steer and buy several cubic yards of black dirt to fill in low spots. While you save on hourly rates, remember to factor in your own time and effort.
For larger or more complicated projects, hiring a professional is often the wisest choice. Professional landscapers or excavation contractors typically charge between $50 and $100 per hour. According to home improvement data, a full professional grading job can cost anywhere from $1,000 to over $3,200. This price covers their expertise, use of heavy equipment, and the assurance that the grade will be correct, protecting your home’s foundation from water damage.
Factors That Influence the Price
Several key factors determine the final cost of grading your yard. The most obvious is the size of the project. Most professionals price jobs at about $0.08 to $2.00 per square foot, with the average residential project costing around $1,700. The steepness of your land also plays a big role, as a significant slope requires more time and soil to correct.
Other variables include your soil type (heavy clay is tougher to work with), site accessibility for heavy machinery, and any obstacles like trees or sheds. The amount and type of fill material you need will also impact the price. You can use our cubic yardage calculator to estimate material needs for your project. Finally, some jobs may require special permits or the installation of additional drainage systems, which will add to the overall cost.
Maintain Your Newly Graded Yard
Once the equipment is gone and the dust has settled, your work isn’t quite finished. Maintaining your new grade is crucial for protecting your investment and ensuring it continues to safeguard your home. A little proactive care goes a long way in keeping your yard healthy and your foundation dry for years to come. Think of it as protecting the hard work you just put in. Regular check-ins and simple upkeep will prevent small issues from turning into major headaches down the road.
Prevent Future Drainage Issues
The primary goal of grading is to control water flow, so your maintenance should focus on keeping that system working. Your yard is now designed for proper grading and drainage, but it needs a little help to stay effective. Regularly walk your property, especially after a heavy rain, to ensure water is still moving away from your foundation as intended.
Check your gutters and downspouts frequently. If they are clogged with leaves or debris, water can overflow and saturate the ground right next to your house, undoing the benefits of your new slope. Make sure downspout extenders are pointing away from the foundation and discharging water several feet away. Keep any swales or drainage channels clear of obstructions so water has an unobstructed path to follow.
Plan for Long-Term Care and Upkeep
As your landscape evolves, always consider how new additions will impact your yard’s grade. If you’re planning to install a new garden bed, patio, or walkway, make sure the project doesn’t accidentally create a dam that traps water against your house. It’s much easier to prevent a problem than to fix foundation damage later.
Over time, soil can settle, creating new low spots. Keep an eye out for any areas where puddles form. You can easily address minor depressions by adding a bit of high-quality fill material like black dirt to level the area before it becomes a bigger issue. A quick inspection each spring and fall can help you catch these spots early and maintain the smooth, effective grade you worked so hard to create.
Related Articles
- What is the Best Gravel for a Driveway? 5 Types Compared – Minnesota Aggregates
- Laser Grading Skid Steer: The Ultimate Buyer’s Guide – Minnesota Aggregates
- Gravel Calculator Tons: 4 Steps to an Accurate Order – Minnesota Aggregates
Frequently Asked Questions
How steep should the slope away from my house be? You don’t need to create a dramatic hill to get the job done. A good rule of thumb is to aim for a drop of about two to three inches for every 10 feet of distance from your foundation. This gentle slope is subtle enough that it won’t look strange, but it’s perfectly effective at guiding water where it needs to go.
Can I just add more dirt to the low spots near my foundation? While it seems like a simple fix, just piling new dirt on top of your lawn can create more problems. For a lasting solution, you should first remove the existing grass and topsoil. Then, you can add and compact your fill material to create the proper slope before putting a final layer of quality topsoil back on top.
What’s the best time of year to grade my yard in Minnesota? The ideal time for a grading project in Minnesota is during the drier seasons, which are usually late spring through early fall. Working with drier soil is much easier, and completing the project during this window gives any new grass seed or sod plenty of time to establish itself before the first winter frost.
Do I need a permit for a yard grading project? For most small, residential grading projects, a permit is not required. However, if your plan involves moving a large amount of soil or could potentially affect how water drains onto a neighbor’s property, it’s always smart to check with your local city planning office first. They can confirm if any specific rules apply to your project.
How long after grading can I plant grass? You can start seeding or laying sod as soon as the grading work is complete. In fact, it’s a good idea to establish a ground cover quickly. Planting grass right away helps hold the new soil in place and prevents your hard work from eroding during the next heavy rain.