Spending your weekends pulling weeds from your gravel driveway can feel like a never-ending battle. But what if you could stop the fight before it even begins? The key isn’t just about removing weeds after they appear; it’s about creating an environment where they can’t thrive. From selecting the right type of angular gravel that locks together to installing a proper weed barrier, every choice you make during installation matters. This article will give you the strategies and techniques you need to prevent weeds in gravel effectively, turning a constant chore into a simple, manageable part of your property maintenance routine.
Key Takeaways
- Proper preparation is non-negotiable: Your best defense against weeds happens before the gravel arrives. Take the time to completely remove all grass and roots, level the ground, and lay down a geotextile membrane for a solid, weed-blocking base.
- Not all gravel is created equal: For the best results, choose an angular, crushed stone like Class 5. Its sharp edges interlock and compact tightly, leaving very little room for seeds to sprout, unlike rounded stones which shift easily.
- A little upkeep goes a long way: Protect your work with simple, regular maintenance. A quick weekly walk-through to pull new sprouts and a seasonal raking to clear debris will stop small problems from becoming big ones.
Why Do Weeds Grow in Gravel?
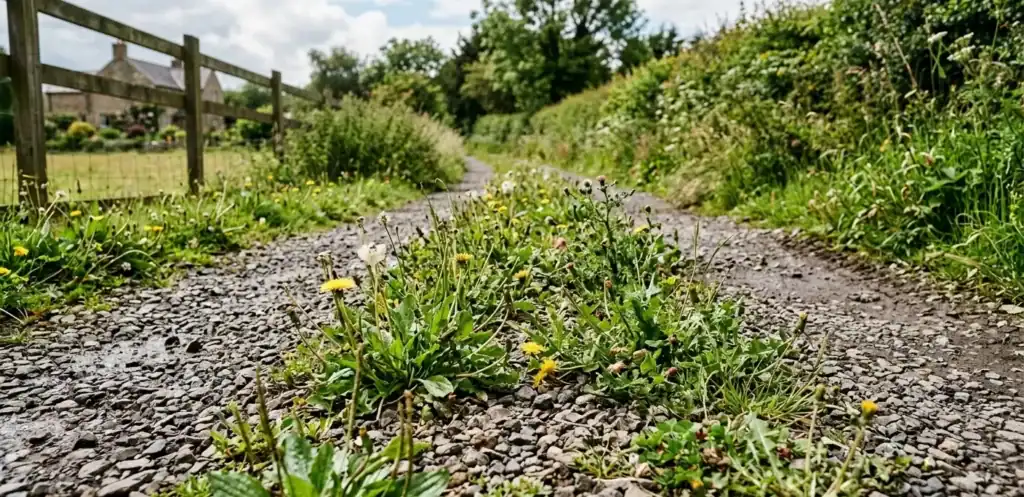
It’s a common frustration: you lay down a beautiful gravel path or driveway, expecting a low-maintenance surface, only to find stubborn weeds poking through a few months later. It might seem like they’re growing directly out of the stones, but the reality is a bit more complex. Gravel itself doesn’t provide nutrients, but it can create the perfect environment for weeds to take root. Understanding how this happens is the first step to preventing it. The process involves a combination of opportunistic seeds finding a home, organic matter creating a makeshift soil, and just the right amount of sunlight and moisture to bring it all to life.
How Seeds Settle In
Weed seeds are expert travelers. They don’t just stay put in one garden bed. Instead, seeds are easily carried by wind or birds and dropped right onto your gravel surfaces. They can also hitch a ride on your shoes, car tires, or even the fur of a passing animal. Once these seeds land, they settle into the small gaps between the gravel stones. They can lie dormant for a surprisingly long time, just waiting for a little bit of soil and water to kickstart their growth. This constant arrival of new seeds is why weed prevention is an ongoing task, not a one-time fix.
Organic Matter Creates Soil
Your gravel driveway might look clean and inorganic, but over time, it collects dust, dirt, and debris. Leaves, grass clippings, and other organic materials get blown in and break down between the stones. This process creates a thin layer of nutrient-rich soil, which is all a determined weed seed needs to germinate. These tiny spaces collect soil and water, which helps weed seeds sprout. This is why a freshly installed Class 5 gravel area is often weed-free, but problems start to appear after a season or two as this organic layer builds up, creating a welcoming home for unwanted plants.
The Role of Sunlight and Moisture
With a seed and a bit of soil in place, the final ingredients for weed growth are sunlight and water. The gaps between gravel stones allow plenty of sunlight to reach the seeds nestled below. Rainwater easily trickles down through the gravel, getting trapped in the small pockets of soil and keeping the area moist. The ground underneath the gravel also has some natural flexibility, which can help seeds find a secure spot to sprout. This combination of light, moisture, and a bit of soil creates a surprisingly effective incubator for all sorts of unwanted plants, turning your pristine path into a patchy green mess.
What Materials Stop Weeds Under Gravel?
The most effective way to stop weeds is to create a barrier between the soil and your gravel. This layer physically blocks weeds from sprouting and reaching the sunlight they need to grow. Choosing the right material depends on your project’s goals, budget, and how long you need it to last. From professional-grade fabrics to simple household items, you have several great options to consider for keeping your gravel areas clean and tidy.
Installing Landscape Fabric
Landscape fabric is a popular choice for a reason. It’s a woven material specifically designed to suppress weeds while still allowing water, air, and nutrients to reach the soil, keeping it healthy. The fabric acts as a durable physical barrier that stops weed seeds from germinating and pushing through to the surface. It’s a reliable, long-term solution for garden paths, patios, and other landscaped areas. When installed correctly over a properly prepared base, it can save you countless hours of weeding down the road.
Using Geotextile Membranes
If you need something more heavy-duty for a driveway or high-traffic path, a geotextile membrane is the way to go. This material is tougher than standard landscape fabric, providing separation and stabilization to prevent gravel from sinking into the soil. While it offers excellent weed suppression, its real strength is supporting your project’s structure. Using a geotextile membrane is a key step when installing a base layer like Class 5 gravel, ensuring your driveway remains stable, level, and weed-free for years.
Trying Cardboard and Newspaper
For a budget-friendly and eco-conscious approach, you can use layers of cardboard or newspaper. This method works by blocking sunlight, which stops weed seeds from sprouting. It’s a fantastic way to recycle, and since the materials are biodegradable, they eventually break down and enrich the soil. The main drawback is that it’s a temporary fix that needs replacing every few years as it decomposes. This makes it a better fit for garden beds or areas you plan to change in the future, not permanent gravel installations.
The Pros and Cons of Plastic Sheeting
Plastic sheeting offers a formidable, non-permeable barrier that weeds can’t penetrate. If your only goal is to stop weeds, it will do the job. However, its biggest strength is also its greatest weakness. Because plastic is waterproof, it prevents any moisture from draining into the soil below. This can lead to water pooling on your gravel and starving the soil of the water it needs. For this reason, plastic sheeting is generally not recommended for most landscaping projects, as it can cause more problems than it solves.
How to Install a Weed-Proof Gravel Base
Creating a weed-proof gravel area isn’t about a single magic trick; it’s about building a solid foundation from the ground up. Taking the time to install your gravel base correctly is the single most effective thing you can do to prevent weeds from taking over later. A little extra effort now saves you hours of weeding down the road. By following these steps, you can create a stable, low-maintenance surface that looks great for years to come. Think of it as setting your project up for long-term success.
Prepare Your Foundation
Before you even think about ordering gravel, you need to prepare the ground. The goal is to create a clean, level slate for your project. Start by removing all existing grass, weeds, and other plant life from the area. It’s far easier to handle this now than after the gravel is in place. For larger areas or tough vegetation, you might need more than a shovel. Using professional skid steer services can make quick work of clearing and grading the site, ensuring a perfectly level and compacted base to build upon. Once the area is clear, rake it smooth and tamp it down to create a firm surface.
Clear Out Existing Plants
Once the bulk of the vegetation is gone, the next step is to make sure nothing can grow back from any roots left behind. One of the most thorough ways to do this is to apply a weed killer to the cleared soil. This helps eliminate any stubborn plants that might try to sprout up through your new gravel. If you prefer to avoid chemicals, you can try covering the area with a tarp for several weeks to smother any remaining growth. Whichever method you choose, the key is to be patient and ensure the area is completely free of living plants before moving on to the next step.
Get the Gravel Depth Right
The depth of your gravel layer plays a huge role in weed prevention. A thick layer of gravel effectively blocks sunlight from reaching the soil, which stops dormant weed seeds from germinating. Aim for a depth of at least two to three inches. A shallow layer might look fine at first, but it won’t be enough to stop persistent weeds. To make sure you order the right amount of material for your project, you can use a cubic yardage calculator to determine your needs based on the square footage and desired depth. This simple step ensures you have enough gravel to create an effective weed barrier.
Choose the Right Gravel Size
The type of gravel you use for your base is just as important as its depth. For a truly solid and weed-resistant foundation, you need a material that compacts well. This is why Class 5 gravel is an excellent choice for a base layer. It’s a mixture of sand and gravel that locks together tightly when compacted, creating a dense surface that’s difficult for weeds to push through. Angular, crushed stones are generally better than smooth, rounded river rocks for a base because their sharp edges interlock to form a more stable and less permeable foundation. This solid base not only helps with weed control but also prevents your top layer of decorative stone from sinking into the soil over time.
What Are the Best Weed Prevention Methods?
Once your gravel is perfectly laid, the next step is to keep it looking clean and pristine. Being proactive is the best way to stop weeds from taking over your hard work. Instead of waiting for them to appear, you can use several methods to prevent them from ever getting a foothold. From simple barriers to clever soil treatments, these strategies create an environment where weeds just can’t thrive. Think of it as setting up a long-term defense for your driveway, path, or patio. Combining a solid installation with one or two of these prevention techniques will save you countless hours of weeding down the road and keep your gravel areas looking sharp all year long. Let’s walk through four of the most effective ways to protect your project.
Apply Pre-Emergent Herbicides
One of the most effective ways to stop weeds before they start is by using a pre-emergent herbicide. Unlike weed killers that target existing plants, pre-emergents work by creating a chemical barrier in the top layer of soil that prevents weed seeds from germinating. For many Minnesota homeowners, this is the secret to a weed-free spring. Applying a pre-emergent treatment can suppress most common grassy weeds like crabgrass before they even have a chance to sprout. The key is timing. You’ll want to apply it in early spring before the soil warms up and seeds begin to grow. A single application can often provide protection for several months, giving you peace of mind and a cleaner gravel surface.
Use Gravel Binders and Stabilizers
If you want to create a truly solid, weed-resistant surface, consider using a gravel binder or stabilizer. These products are special liquid polymers that you pour or spray over your gravel. As the liquid dries, it hardens and locks the stones together, creating a durable, semi-permeable surface. This process fills in the small gaps between the gravel where weed seeds could otherwise settle and sprout. Using a binder not only helps keep your driveway solid and weed-free but also reduces dust and prevents the gravel from scattering. It’s an excellent solution for high-traffic areas and for anyone looking for a low-maintenance, long-term weed prevention strategy.
Try Soil Solarization
For an eco-friendly approach, soil solarization is a fantastic chemical-free option. This method uses the sun’s natural power to heat the soil and kill off weeds, seeds, and pathogens. To do this, you simply cover the weedy gravel areas with a clear plastic sheet on warm, sunny days. The plastic traps solar radiation, raising the soil temperature to levels that are lethal for most weeds and their seeds. This technique is most effective during the hottest summer months when the sun is at its strongest. While it requires a bit of patience, soil solarization is a highly effective way to clear a patch of ground before you lay new gravel or to treat an existing area that’s become overgrown.
Install Edge Barriers
Sometimes the biggest weed problem comes from the surrounding lawn or garden beds. Weed seeds can easily spread from your grass into the gravel, creating a constant battle along the edges. A simple and effective solution is to install physical edge barriers. Placing barriers like metal or plastic edging along the borders where your lawn meets the gravel creates a wall that stops this migration. This simple step can significantly reduce the number of weeds you have to deal with by containing your lawn and protecting your gravel. It also gives your driveway or walkway a clean, defined look, improving its overall appearance while making maintenance much easier.
How to Remove Weeds From Gravel
Even with the best preventive measures, a few stubborn weeds might still find their way through your gravel. When they do, you have several effective options for getting rid of them. The right method for you will depend on the size of the area, the type of weeds, and your personal preference for chemical versus natural solutions. Tackling them as soon as you spot them is the key to keeping your gravel driveway or path looking clean and well-maintained.
Choosing your approach is a balance of effort, cost, and environmental consideration. For small, scattered weeds, manual removal is often the simplest choice. If you’re facing a more widespread issue but want to avoid synthetic chemicals, natural solutions like horticultural vinegar or flame weeding can be incredibly effective. These methods require a bit more care in their application but offer peace of mind. For large or particularly persistent infestations where other methods have failed, chemical herbicides provide a powerful and fast-acting solution. No matter which path you choose, consistency is your best friend. A little bit of regular maintenance goes a long way in preventing a small weed problem from turning into a major landscaping headache. Let’s walk through the most common and effective ways to clear out those unwanted plants.
Pull Weeds by Hand
Pulling weeds by hand is a classic for a reason: it’s direct, effective, and requires no special equipment. This method is ideal for small patches of weeds or for routine maintenance when you only have a few to deal with. For the best results, try to pull weeds after a good rain. The moisture softens the soil underneath the gravel, making it much easier to pull out the entire plant, root and all. If you leave the root behind, the weed will likely grow back. It does take time and effort, but for many homeowners, it’s a satisfying and chemical-free way to keep their gravel looking pristine.
Use Natural Methods like Vinegar
If you prefer a natural approach but have too many weeds to pull by hand, vinegar can be a great solution. However, the vinegar in your kitchen pantry probably won’t be strong enough. Look for horticultural vinegar, which contains a much higher concentration of acetic acid (around 20-50%). This powerful solution works by drawing moisture out of the plant’s leaves, causing them to wither. For maximum effectiveness, spray the weeds on a hot, sunny day with no rain in the forecast. The sun helps accelerate the process. Be careful to spray only the weeds, as this potent vinegar can also harm any nearby plants you want to keep.
Consider Flame Weeding
For a fast and chemical-free option, you might want to try flame weeding. This technique uses a propane torch designed for gardening to apply intense, direct heat to the weeds. You don’t need to completely incinerate the plant; a quick pass of one or two seconds is enough. The heat ruptures the plant’s cell walls, causing it to wilt and die within a day or two. Flame weeding is especially effective on young weeds that have just sprouted in your gravel. Always use extreme caution with this method. Keep the flame away from desirable plants, wooden structures, and any flammable materials, and avoid using it during dry, windy conditions.
Apply Chemical Herbicides
When you’re dealing with a large, persistent weed problem, chemical herbicides can be a very effective tool. There are many types available, including selective herbicides that target specific weeds and non-selective ones that kill any plant they touch. For gravel areas, a non-selective herbicide is often the most practical choice. It’s crucial to read and follow the manufacturer’s instructions carefully to ensure you’re applying it safely and effectively. Protect your other plants by shielding them with cardboard while you spray, and always wear appropriate protective gear. Using chemical herbicides safely ensures you get rid of the weeds without causing unintended harm to your yard or the environment.
How to Keep Your Gravel Weed-Free
Once your gravel is installed, the key to keeping it looking great is consistent maintenance. Don’t worry, this doesn’t mean hours of back-breaking work every weekend. A little proactive care goes a long way in preventing weeds from ever getting a chance to settle in. By building a few simple tasks into your routine, you can keep your gravel paths, driveways, and patios clean and tidy all year round. Think of it as protecting the investment you’ve already made in your property. These simple habits will save you from a much bigger cleanup job down the road. The goal isn’t to eliminate every single potential weed seed, which is nearly impossible, but to create an environment where they can’t thrive. Regular upkeep disrupts the life cycle of weeds before they can establish deep roots and become a real problem. It’s about working smarter, not harder. A few minutes spent each week inspecting and tidying your gravel areas will maintain their crisp, clean appearance and ensure they remain functional and attractive for years to come. This approach turns a potentially large chore into a series of small, manageable steps.
Inspect and Clean Regularly
The easiest weed to pull is the one that just sprouted. Make it a habit to walk through your gravel areas once a week, especially after it rains. Look for any tiny green sprouts poking through the stones. Weeds can grow from seeds carried by the wind, dropped by birds, or tracked in on your shoes, so even the best-laid foundations can see a few intruders. Catching them early means you can often pull them out with your fingers, root and all, before they have a chance to establish themselves. This quick, regular check is your first and best line of defense.
Rake and Sweep Your Gravel
A stiff-tined rake or a push broom is one of your best tools for ongoing weed prevention. Regularly raking or sweeping your gravel does more than just keep it looking neat. This action disturbs the top layer of stones, which prevents airborne seeds from settling into a comfortable spot to germinate. It also helps clear away organic debris like fallen leaves, twigs, and dirt that can break down and create a thin layer of soil for weeds to grow in. A quick rake-through every couple of weeks is a simple step that makes a huge difference in keeping your gravel surfaces pristine.
Know When to Add a Fresh Layer
Over time, gravel can become compacted, get pushed aside by tires, or thin out, reducing its effectiveness as a weed barrier. Check your gravel depth periodically. You should aim to maintain a layer that’s at least two to three inches deep to properly block sunlight from reaching the soil underneath. If you notice bare or thin spots, it’s time to top it off. Adding a fresh layer of Class 5 gravel can refresh the look of your driveway or path and restore its weed-blocking power. You can use a cubic yardage calculator to figure out exactly how much material you’ll need for the job.
Plan for Seasonal Upkeep
Tying your gravel maintenance to the seasons can make it easier to remember. In the spring, after the Minnesota snow melts, give your gravel a thorough raking to clear out any winter debris and smooth out areas heaved by frost. This is also a good time to handle any weeds that may have survived the cold. In the fall, make sure to remove fallen leaves promptly before they get wet, break down, and create a compost bed for next year’s weeds. A little seasonal tidying ensures your gravel is prepared for the months ahead and reduces your workload later on.
Which Gravel Types Prevent Weeds Best?
Choosing the right gravel is one of your best defenses against weeds. While it might seem like any stone will do, the type of gravel you lay down can make a huge difference in how much time you spend on maintenance later. The secret lies in the gravel’s size, shape, and how well it compacts. A tightly packed surface leaves very little room for opportunistic seeds to find soil, sunlight, and moisture. When you’re planning a new gravel driveway, path, or patio, thinking about weed prevention from the start will save you a lot of headaches. The goal is to create an environment where weeds simply can’t get the foothold they need to thrive. By selecting a gravel that compacts well and fits together snugly, you’re essentially building a shield over the soil. Let’s look at the specific characteristics that make certain gravels more effective at keeping your landscape looking clean and tidy.
Why Class 5 Gravel Is a Great Choice
If you’re looking for a reliable, weed-resistant base, Class 5 gravel is an excellent choice. This material is a carefully formulated mixture of sand and gravel that is designed for maximum compaction. Because Class 5 gravel packs down so tightly, it creates a solid, stable surface that leaves minimal space for weed seeds to settle and germinate. This dense base makes it incredibly difficult for roots to take hold. According to landscaping experts, a well-compacted base is key to vegetation management in gravel areas. By minimizing the gaps where organic matter can collect, you effectively starve weeds of the soil they need to grow. For driveways, walkways, and foundational layers, the stability and weed-blocking power of Class 5 are hard to beat.
Angular vs. Rounded Gravel
The shape of your gravel plays a surprisingly big role in weed prevention. Gravel is generally categorized as either angular or rounded. Angular gravel is produced by crushing larger rocks, giving it sharp, flat edges. Rounded gravel, like pea gravel, has been naturally smoothed by water and friction. For weed control, angular gravel is the clear winner. Its sharp edges allow the stones to interlock better, creating a dense and stable surface that is difficult for seeds to penetrate. Rounded stones, on the other hand, tend to shift and roll, constantly creating new gaps where weeds can sprout. While rounded gravel can be a great decorative choice, angular gravel provides a more functional, low-maintenance solution for areas like driveways and paths.
How Gravel Size Affects Weed Growth
When it comes to gravel size, finding the right balance is key. It might seem logical that smaller gravel would leave fewer gaps, but that’s not always the case. Very fine gravel can act more like soil, giving seeds a perfect place to sprout. On the other hand, very large rocks can leave significant voids between them, where dirt and debris can easily accumulate and support weed growth. Generally, a medium-sized angular gravel provides the best coverage and stability. This is another reason why Class 5 works so well; its blend of different-sized particles allows it to compact into a dense layer with very few voids. By choosing the right size and ensuring you have the correct depth, you can create a durable surface that stands up to weeds.
Common Gravel Weed Prevention Mistakes to Avoid
Putting in the work to create a beautiful gravel driveway or path is a great feeling, but seeing weeds pop up can be frustrating. Often, this happens because of a few common missteps in the installation or maintenance process. Knowing what these mistakes are ahead of time can save you a lot of effort down the road. By avoiding these pitfalls, you can ensure your gravel areas stay clean and look great for years to come. Let’s walk through some of the most frequent errors so you can get it right the first time.
Misusing Weed Fabric
Landscape fabric seems like the perfect solution, but it’s often used incorrectly. While it can be effective initially, many people find that weed fabric doesn’t work well in the long run. The problem is that dust, dirt, and leaves eventually settle on top of the gravel, creating a new layer of soil for wind-blown seeds to sprout in. The fabric below does nothing to stop these surface weeds. For the best results, use a high-quality geotextile fabric and ensure your gravel layer is deep enough to prevent sunlight from reaching any soil that accumulates on the fabric’s surface.
Preparing the Base Incorrectly
A weed-free gravel area starts with a solid, clean foundation. A major mistake is laying gravel directly over existing weeds or grass. Even if you cover them with fabric, determined weeds can push through. Before you bring in any materials, you must remove all existing plant life from the soil, roots and all. This is much easier to do before the gravel is in place. For larger areas, using professional equipment can make the job faster and more thorough. Properly preparing the site is the most critical step for long-term weed prevention.
Using Salt to Kill Weeds
Using rock salt to kill weeds is a tempting shortcut, but it can cause serious, long-term damage to your property. Salt essentially sterilizes the soil, making it impossible for anything to grow there for years. While that might sound good for a gravel path, the salt can easily leach into surrounding garden beds or your lawn, killing plants you want to keep. It can also corrode concrete and pavers. It’s best to avoid this method and stick to weed killers designed for residential use or natural alternatives that won’t harm your soil’s future health.
Skipping Regular Maintenance
Installing a weed-proof base is a fantastic start, but no solution is a one-time fix. The biggest mistake you can make is assuming the job is done once the gravel is down. Weeds will inevitably try to find a way back as organic material builds up over time. You’ll need to stay on top of maintenance to keep your gravel looking its best. This means periodically raking the gravel to disrupt new seedlings, pulling any weeds that do appear, and keeping the area clear of leaves and debris. A little bit of upkeep goes a long way.
Related Articles
- Minnesota Class 5 Delivery | Gravel for Driveways & Projects
- Trusted Minnesota Aggregate Supplier | Quality Materials
- From Foundations to Finishes: Innovative Uses of Asphalt Millings in Every Project – Minnesota Aggregates
Frequently Asked Questions
Do I really need to put landscape fabric under my gravel? While it’s a common step, it’s not always the magic bullet people expect. A better choice for driveways and paths is a heavy-duty geotextile membrane. Its main job is to separate the gravel from the soil below, which prevents the stones from sinking and keeps the base stable. While it does block weeds from pushing up from underneath, remember that new weeds can still sprout on top of the gravel if leaves and dirt accumulate. Think of it as a crucial part of a stable foundation, not just a weed blocker.
What makes Class 5 gravel better for stopping weeds than other types? The secret to Class 5 gravel is its ability to compact. It’s a specific mix of crushed stone and sand that locks together tightly when pressed down, creating a solid, dense surface. This leaves very few tiny gaps where windblown seeds can settle and find soil to grow. In contrast, rounded stones like pea gravel are constantly shifting, which creates new openings for weeds to take hold. For a truly low-maintenance base, the tight compaction of Class 5 is your best defense.
How deep does my gravel need to be to actually prevent weeds? You should aim for a gravel depth of at least two to three inches. The primary goal of the gravel layer is to block sunlight from reaching the soil and any dormant weed seeds lying in wait. A shallow, one-inch layer might look fine initially, but it’s not thick enough to stop sunlight from filtering through. A deeper layer creates a much more effective light barrier and makes it physically harder for any determined sprouts to push their way to the surface.
I already have weeds in my gravel. What’s the most effective way to get rid of them for good? The best method depends on how many weeds you have. If you only see a few scattered here and there, pulling them by hand after a good rain is the simplest solution. For larger patches, a natural option like horticultural vinegar or a flame weeder can work quickly on a hot, sunny day. If you’re dealing with a widespread and stubborn problem, a non-selective chemical herbicide will provide the most powerful results, but you must apply it carefully according to the directions to protect surrounding plants.
Is it possible to have a weed-free gravel driveway without using chemicals? Absolutely. A chemical-free strategy relies entirely on proper installation and consistent maintenance. Start by completely clearing the area of all existing plants before you lay down a geotextile membrane. Then, install a deep, three-inch layer of a compacting gravel like Class 5. Finally, make a habit of raking the gravel every few weeks to clear debris and disturb any new seeds that have landed. This proactive approach creates an environment where weeds simply can’t get established.