A great gravel driveway is built from the ground up. Just like building a house, you can’t have a sturdy structure without a solid foundation. Simply dumping gravel on unprepared soil is a recipe for ruts, weeds, and a lumpy mess next spring. The success of your project depends on proper preparation, layering, and compaction. Learning how to spread gravel on a driveway is really about learning how to build a stable system that can handle vehicle traffic and harsh weather. We’ll break down the essential steps, from creating a firm base to applying thin, even layers, so you can avoid common mistakes and build a driveway that performs as good as it looks.
Key Takeaways
- Preparation is the Key to Longevity: A lasting driveway starts with a solid base. You must clear the area, compact the soil, lay down landscape fabric to block weeds, and grade the surface to ensure proper water drainage.
- Select the Right Materials and Layer Them Correctly: Choose an angular, crushed stone like Class 5 that locks together firmly, not rounded gravel that shifts under weight. Apply the material in thin layers, compacting each one completely before adding the next to build a stable surface.
- Finish Strong with Compaction and Simple Upkeep: Thoroughly compacting each layer is what creates a professional, rut-resistant finish. After the job is done, keep your driveway looking great with simple maintenance like occasional raking and adding a fresh top layer of gravel every year.
How to Prep Your Driveway for New Gravel
A great gravel driveway starts long before the first stone is spread. Proper preparation is the secret to a surface that looks good, performs well, and lasts for years. Skipping these foundational steps can lead to a lumpy, weedy, and short-lived driveway that needs constant repairs. Think of it as building a house; you wouldn’t start without a solid foundation. A well-prepared base is what separates a professional-looking driveway from one that becomes a maintenance headache. Taking the time to prep the area correctly ensures your new gravel has a stable base to rest on, which prevents sinking, improves drainage, and keeps your driveway in top shape through every Minnesota season. From clearing the ground to ensuring water runs off correctly, each step builds upon the last. This initial work might seem like a lot, but it will save you countless hours and dollars in the long run by preventing common issues like potholes and erosion. Follow these steps to create a solid foundation for your project and get it right the first time.
Clear and Excavate the Area
First things first, you need a clean slate. Start by clearing the entire driveway area of any grass, weeds, large rocks, or existing surface material. Once the surface is clear, it’s time to excavate. You’ll want to dig down about 8 to 12 inches to make room for your base material and top layer of gravel. This depth is crucial for creating a strong, stable driveway that can handle vehicle traffic without developing ruts. For larger driveways, this can be a big job to tackle by hand. Renting equipment or using professional skid steer services can save you a lot of time and back-breaking work, ensuring the area is excavated evenly and efficiently.
Check for a Level and Stable Base
With the area excavated, your next focus is the subgrade, which is the native soil at the bottom of your trench. This layer needs to be as firm and compact as possible to prevent your new driveway from sinking over time. Use a plate compactor or a hand tamper to pack down the soil until it’s solid and level. Once the subgrade is compacted, you’ll add your base layer. A high-quality road base, like Class 5 gravel, is the perfect choice for creating a durable foundation. Spread a layer of about 4 to 6 inches, then compact it thoroughly before moving on.
Lay Down Landscape Fabric
This step is a game-changer for long-term maintenance. Before you add your top layer of gravel, roll out a heavy-duty landscape fabric over the entire compacted base. This fabric acts as a barrier, serving two important purposes. First, it prevents weeds from growing up through your gravel, which will save you a lot of hassle later on. Second, it keeps your gravel separate from the soil and base layer below. This separation prevents the stones from sinking into the ground over time, maintaining the driveway’s depth and stability. Make sure to overlap the edges of the fabric by several inches to ensure complete coverage.
Create a Slope for Drainage
Proper drainage is essential for any gravel driveway, especially with Minnesota’s weather. Without it, water will pool on the surface, leading to ruts, potholes, and a muddy mess. You need to grade the driveway so that water flows away from the center and off the sides. A slight slope of about 2%, or a quarter-inch drop for every foot of width, is ideal. You can create this by forming a subtle crown in the center of the driveway, making it slightly higher than the edges. This gentle slope will channel rain and snowmelt away, keeping your driveway dry, stable, and in great condition for years to come.
Choose the Right Gravel for Your Driveway
Picking the right gravel is about more than just color or size. The type of material you choose will determine how well your driveway holds up to Minnesota weather, how stable it feels under your tires, and how much maintenance it needs down the road. A great driveway is built in layers, with each layer serving a specific purpose. Getting the foundation and the surface material right is the key to a long-lasting driveway that looks great and performs even better. Let’s walk through the best options so you can make a confident choice for your project.
Why Class 5 Is a Minnesota Favorite
If you’ve spent any time on a construction or landscaping project in Minnesota, you’ve heard of Class 5. There’s a good reason it’s the go-to choice here. Class 5 gravel is a compactable material made of a specific mix of sand and rock, which allows for excellent drainage while packing down into a firm, stable surface. This is incredibly important for our climate, where freeze-thaw cycles can wreak havoc on poorly built surfaces. For the top layer of a driveway that sees regular car traffic, a ¾-inch to 1-inch crushed stone is ideal. It provides great traction and stays put, preventing the ruts and soft spots that can form with less suitable materials.
Crushed Stone vs. Rounded Gravel
You might be tempted by the smooth, uniform look of rounded river rock or pea gravel, but it’s not the right choice for a driveway surface. Because the stones are round, they never truly lock together. Instead, they shift and roll under the weight of a vehicle, much like walking on marbles. This creates an unstable surface that’s difficult to walk on and drive on. Crushed stone, on the other hand, has angular, fractured edges that interlock tightly when compacted. This creates a solid, stable surface that stays in place. Materials like crushed limestone are particularly effective because they contain fine dust that helps bind the stones together for an even firmer finish.
Select Your Base and Top Layers
A durable gravel driveway is a system, not just a single pile of rock. It starts with a strong foundation. Before you even think about the top layer, you need a solid base of about four to six inches of a larger, heavier aggregate. This base layer distributes the weight of vehicles and prevents the top layer from sinking into the soil below. Once your base is compacted and stable, you can add your top layer. This is the gravel you’ll see and drive on every day. Apply it in thin layers, about two to three inches at a time, and compact each one thoroughly before adding the next. This layering process is crucial for proper compaction and a long-lasting result. Using professional skid steer services can make this job much faster and more effective.
How Much Gravel Do You Need?
Figuring out the right amount of gravel for your driveway project can feel like a tricky math problem, but it’s simpler than you think. Getting this calculation right from the start is key. Ordering too little means you’ll have to pause your project and wait for another delivery, while ordering too much leaves you with a pile of gravel and a lighter wallet. The goal is to get just the right amount to create a durable, even surface that lasts.
We’ll walk through three simple steps to determine exactly how much material you need. First, you’ll measure the area you plan to cover. Next, you’ll convert those measurements into the cubic yards needed for your order. Finally, we’ll talk about why ordering a little extra is a smart move to account for settling and compaction. By following these steps, you can confidently place your order for Class 5 delivery and get your project started on the right foot.
Measure Your Driveway’s Dimensions
First things first, grab a measuring tape. You need to find the length and width of your driveway in feet. If your driveway has an irregular shape, like a curve or a turnaround spot, just break it down into smaller, manageable rectangles or squares and measure each one separately. Add the areas of these smaller sections together later to get your total square footage.
Next, decide on the depth of your gravel layer. For a fresh top coat, 2 to 3 inches is usually enough. If you’re building a new driveway from scratch or doing a major overhaul, you’ll want a base layer of at least 4 to 6 inches for proper stability. Write these three numbers down: length, width, and desired depth in inches.
Calculate the Cubic Yards
Now it’s time for a little math, but don’t worry, we’ll keep it simple. The standard unit for ordering materials like gravel is the cubic yard. To find out how many you need, you’ll first calculate the volume in cubic feet and then convert it.
Start by converting your depth measurement from inches to feet by dividing it by 12 (so, 3 inches becomes 0.25 feet). Then, multiply your three measurements: Length (ft) x Width (ft) x Depth (ft) = Total Cubic Feet. To get your final number, divide the total cubic feet by 27, since there are 27 cubic feet in one cubic yard. If math isn’t your thing, you can skip these steps and use our handy cubic yardage calculator to get an instant estimate.
Order a Little Extra for Compaction
Once you have your final number, it’s a good idea to add a little extra to your order. We recommend ordering about 10% more gravel than your calculation suggests. This isn’t about overspending; it’s a practical step that accounts for the natural settling and compaction that happens when you spread and pack down the gravel.
This extra material acts as a buffer, ensuring you have enough to fill any low spots or uneven areas for a perfectly level finish. It saves you the headache and potential extra cost of placing a small second order if you run short. Having a small surplus is always better than having to halt your work right before the finish line.
Gather Your Tools and Materials
Before your gravel arrives, it’s smart to have everything you need ready to go. Gathering your tools and materials ahead of time will make the entire process smoother and more efficient. The size of your driveway will determine whether you can get by with basic hand tools or if you’ll want to bring in some heavier equipment. Think of it as setting up your workspace for success; a little preparation now saves a lot of headaches later. This ensures that once your gravel is delivered, you can get straight to work creating a beautiful, durable surface.
Essential Hand Tools
For smaller driveways or simple touch-up jobs, a few key hand tools are all you really need. A sturdy wheelbarrow is essential for moving gravel from the main pile to different sections of your driveway, and you’ll want a flat-head or scoop shovel to load it. A hard-tined garden rake or a wider landscape rake is your best friend for spreading the gravel into an even layer. Finally, a hand tamper will help you compact the gravel, creating a firmer, more stable surface that settles less over time. These simple tools are the foundation of a solid DIY gravel project.
Power Equipment Options
If you’re working with a long or wide driveway, power equipment can be a game-changer. Renting a skid steer or a compact tractor with a front-end loader will make moving and spreading large amounts of gravel incredibly fast. For compaction, a plate compactor provides a much more solid and professional finish than a hand tamper can. If you’d rather not operate the machinery yourself, our professional skid steer services can handle the heavy lifting for you, ensuring your gravel is spread quickly and evenly. This can turn a multi-day manual labor project into a single afternoon’s work.
Safety Gear and Other Supplies
Don’t forget to protect yourself while you work. Spreading gravel can kick up a lot of dust and small debris, so safety should be a priority. A good pair of work gloves will save your hands from blisters and scrapes, while safety glasses are a must for protecting your eyes. It’s also a smart idea to wear a dust mask to avoid inhaling fine particles, especially on a dry, windy day. Finally, wear sturdy, closed-toe boots to protect your feet and provide good traction. Having the right safety gear on hand means you can focus on the task without worrying about preventable injuries.
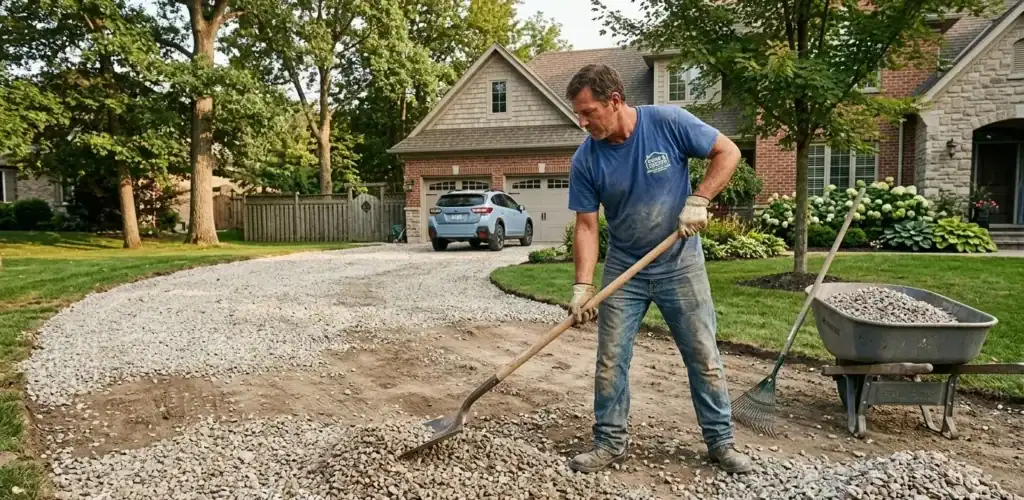
How to Spread Gravel by Hand
Spreading gravel by hand is a big job, but it’s completely manageable with the right technique. This approach is perfect for smaller driveways or areas where you can’t get heavy equipment. The key is to work smart, not just hard. By breaking the process down into simple steps, you can create a smooth, durable surface that will last for years. It all starts with getting the gravel in the right spot and then building your driveway layer by layer.
Dump and Distribute the Gravel
To save yourself a lot of back-breaking work, start by making the delivery process work for you. When you place your order, ask the driver to “tailgate” the gravel. This just means they’ll open the back gate slightly and spread the material in a line as they drive forward, giving you a head start on distribution. Have them dump the gravel as close as possible to your project area. You can skip laying down a tarp; it often makes shoveling more difficult. When you start moving the gravel, slide your shovel under the stone from the edge of the pile, almost like you’re sliding a peel under a pizza. This technique makes it much easier to get a full shovel load each time.
Apply Gravel in Thin Layers
The secret to a long-lasting gravel driveway is building it in thin, compacted layers. Don’t try to dump all your material at once. Instead, spread your Class 5 gravel in layers of about two to three inches at a time. Spreading a layer thicker than four inches will prevent it from compacting properly, leading to a soft, unstable surface that can sink over time. Before you even add the first layer of gravel, make sure the ground underneath is compacted. Then, after you spread each layer of gravel, you’ll need to compact it thoroughly before adding the next one. This methodical process ensures your driveway has a strong, solid foundation.
Rake and Tamp Down Each Layer
Once you have a thin layer of gravel down, it’s time to level and compact it. Use a sturdy hard-tined rake or a wide landscape rake to smooth out the surface, removing any high spots or filling in low areas. After raking it level, you need to tamp it down. For smaller projects, a hand tamper will work. For a driveway, an easy DIY method is to drive your car or truck back and forth over the entire surface multiple times. For the best results, consider renting a plate compactor from a local hardware store. This machine will give you the most professional and durable finish. Just remember the pattern: spread, rake, compact, and then repeat with the next layer.
How to Spread Gravel with Equipment
If you’re working on a long driveway or a large parking area, spreading gravel by hand can feel like an endless task. Using heavy equipment is a game-changer. It not only saves you a ton of time and physical effort but also helps you achieve a more professional, even finish. A tractor or skid steer can do in a few hours what might take a whole weekend with a shovel and wheelbarrow. This approach is all about working smarter, not harder, to get a durable and great-looking gravel surface that will last for years.
Use a Tractor or Skid Steer
A tractor with a front-end loader is a fantastic tool for spreading gravel over large areas. You can scoop a large amount of gravel from the pile, drive it to where you need it, and gently dump and shake it out. Once you have several piles distributed, you can use the back of the bucket or a box blade attachment to back-drag the gravel, smoothing it into an even layer. For really big projects or if you need more maneuverability, a skid steer is your best friend. If you don’t own one, you can always hire a professional to get the job done right with the proper equipment. Our skid steer services can handle the heavy lifting for you.
The Benefits of Using Heavy Equipment
The main advantage of using machinery is efficiency. You can move a massive amount of material quickly, which is a huge plus for any project with a deadline. Beyond speed, equipment ensures a much more even distribution of gravel. A consistent layer is key to the longevity of your driveway, preventing low spots where puddles can form and cause issues later. Spreading gravel correctly from the start saves you money and hassle on future repairs. It’s an investment in a stable, long-lasting surface that can handle Minnesota’s weather and daily traffic with ease.
Safety Tips for Operating Machinery
Operating heavy machinery requires your full attention. To stay safe, always add weight to the back of your tractor, like a box blade or fluid in the tires, when carrying a full, heavy bucket of gravel. This simple step acts as a counterbalance and takes a lot of stress off the tractor’s front end. When you’re moving, lift your bucket just high enough to see your target area clearly. Before you dump a full load, do a small test pour by tilting the bucket slightly. This helps you gauge how the gravel will fall so you can place it exactly where you want it.
How to Properly Level and Compact Gravel
Spreading the gravel is just one part of the job. The real secret to a long-lasting driveway lies in how you level and compact it. This step is what separates a smooth, durable surface from a lumpy, rut-filled mess that you’ll have to fix next season. Taking the time to properly grade, compact, and smooth the gravel ensures your driveway can handle Minnesota weather, from heavy spring rains to winter snowplows. It creates a stable foundation that prevents sinking, shifting, and drainage problems down the road. Think of it as the finishing touch that locks in all your hard work and gives you a professional-quality result that lasts for years.
Grade the Surface for Proper Drainage
Water is the number one enemy of a gravel driveway. If it pools on the surface, it can lead to erosion, soft spots, and treacherous ice patches in the winter. To prevent this, you need to grade the area for proper drainage. The goal is to create a gentle slope that directs water away from the driveway and any nearby structures. A good rule of thumb is a 2% grade, which works out to about a quarter-inch drop for every foot of width. This slight angle is enough to keep water moving without being noticeable when you drive or walk on it. Use a level and string line to ensure your slope is consistent across the entire surface.
Use the Right Compaction Techniques
A solid, compacted base is the key to a driveway that won’t sink or develop ruts. Before you even bring in your new gravel, make sure the ground underneath is thoroughly compacted. Once you start spreading, apply the gravel in thin layers, about two to three inches deep at a time. After spreading each layer, compact it completely with a tamper or plate compactor before adding the next one. This layer-by-layer method is crucial because it ensures the entire depth of your driveway is solid. Using a quality material like Class 5 gravel is perfect for this process, as its mix of rock and fines is designed to lock together tightly when compacted.
Smooth Out the Final Surface
For that clean, professional finish, the final smoothing is key. If you’re working by hand, try to dump your wheelbarrow loads strategically to minimize how much you have to rake. A good landscape rake will help you even out any high or low spots for a uniform surface. If you’re using equipment, our skid steer services can make this step much faster. When using a loader, you can set the bucket to “float” mode. This allows it to follow the contours of the ground as you back up slowly, effectively smoothing the gravel with minimal effort and leaving you with a perfectly finished driveway.
Avoid These Common Gravel Driveway Mistakes
Building a gravel driveway is a rewarding project, but a few common missteps can lead to a lumpy, weedy, or short-lived surface. The good news is that these mistakes are easy to avoid with a little planning. Taking the time to prepare your site correctly, choose the right materials, and install them properly will save you from future headaches and extra costs. A well-built gravel driveway not only looks great but also stands up to Minnesota’s tough weather, from heavy spring rains to snowy winters.
Think of it like baking a cake. You wouldn’t just throw all the ingredients in a pan and hope for the best. You have to measure carefully, mix everything in the right order, and bake it at the correct temperature. Similarly, your driveway needs a solid foundation, the right layers of gravel, and proper compaction to ensure it lasts for years. Let’s walk through the most frequent errors people make so you can get your project right the first time.
Improper Raking and Compaction
Once your gravel is delivered, it’s tempting to rake it out quickly to see the finished product. However, raking too aggressively can disturb the landscape fabric or the base layer underneath, creating weak spots. Use a sturdy landscape rake to gently pull the gravel into place, keeping the layers even. More importantly, don’t skip compaction. Each layer of gravel needs to be thoroughly compacted to create a stable, interlocking surface that won’t sink or shift under the weight of a vehicle. A plate compactor or a heavy roller will do the trick, ensuring your driveway remains solid and smooth.
Choosing the Wrong Gravel Depth or Type
Not all gravel is created equal, and using the wrong kind or not enough of it is a recipe for a messy driveway. For a surface that will see regular vehicle traffic, you need a depth of at least four to six inches. Using less will result in ruts and bare spots. The type of gravel matters, too. While smooth, rounded river rock looks nice, it doesn’t lock together and will constantly shift. Instead, opt for a crushed, angular stone like Class 5 gravel, which is a Minnesota standard for a reason. Its mix of coarse and fine materials creates a firm, stable surface that drains well.
Skipping Site Prep and Drainage
A great driveway starts with a great foundation. Simply dumping gravel onto unprepared soil is one of the biggest mistakes you can make. The ground underneath will shift, and weeds will quickly poke through. Before you do anything else, clear the area of all grass and vegetation, dig down to the proper depth, and lay down a quality landscape fabric. You also need to plan for drainage. A completely flat driveway will turn into a puddle during a downpour. Create a slight crown or a gentle 2% slope to one side to ensure water runs off instead of pooling and washing your gravel away.
Maintain Your New Gravel Driveway
You’ve put in the work to create a beautiful and functional gravel driveway. Now, a little routine maintenance will keep it looking its best and extend its life for years to come. These simple, proactive steps will help you prevent common issues like ruts, weeds, and drainage problems, ensuring your investment stays solid and stable through every Minnesota season.
Rake Regularly and Add Gravel Yearly
Think of regular raking as a quick touch-up for your driveway. Once a month, grab a sturdy landscape rake and walk the length of your driveway, smoothing out any ruts or low spots that have formed from daily traffic. This simple task helps redistribute the gravel evenly and keeps the surface level.
Over time, gravel will settle and get displaced. To keep your driveway in top shape, plan to add a thin layer of new gravel yearly, especially in high-traffic areas. When you notice the gravel layer looking thin, a fresh Class 5 delivery will restore its depth and appearance.
Control Weeds and Maintain Drainage
Even with landscape fabric, a few determined weeds might pop up. The key is to pull them as soon as you see them before their roots can take hold. Staying on top of weed removal keeps your driveway looking clean and prevents the root systems from disrupting the gravel base.
Proper drainage is also crucial for preventing potholes and erosion. Periodically check that the crown or slope of your driveway is still intact, allowing water to run off the sides. After a heavy rain, look for any puddles, as these indicate low spots that need to be filled with more gravel and compacted.
Consider Edging and Seasonal Upkeep
Installing an edge along your driveway is a great way to keep gravel from migrating into your lawn or garden beds. Materials like stone, metal, or pressure-treated wood create a clean, defined border and reduce the amount of gravel you lose over time.
Seasonal care is also important. Before winter arrives, make sure your driveway is properly graded to handle snowmelt. For icy conditions, a sand delivery provides excellent traction without the corrosive effects of rock salt. In the spring, inspect for any damage from snowplows or the freeze-thaw cycle and make repairs as needed.
Related Articles
- Minnesota Class 5 Delivery | Gravel for Driveways & Projects
- From Foundations to Finishes: Innovative Uses of Asphalt Millings in Every Project – Minnesota Aggregates
- Fast Minnesota Asphalt Milling Delivery | On-Time Service
- Minnesota Black Dirt Delivery | Fast & Affordable Service
- Mixing It Up: The Versatile Role of Asphalt Millings, Black Dirt, Sand, & Class 5 in Projects – Minnesota Aggregates
Frequently Asked Questions
What’s the best type of gravel for a driveway in Minnesota? For a driveway that needs to stand up to our weather, you can’t go wrong with Class 5 gravel. It’s a specific mix of crushed stone and sand that compacts into a very firm, stable surface. The angular pieces lock together, which prevents the shifting and rutting you’d get with rounded stones like pea gravel. This stability is exactly what you need to handle the freeze-thaw cycles that can tear apart less durable materials.
Can I just put new gravel on top of my old grass or dirt driveway? I really advise against it. Simply dumping gravel over unprepared ground is a shortcut that leads to long-term problems. Without a proper base, the gravel will sink into the soft soil, weeds will grow right through it, and you’ll have major issues with drainage. Taking the time to clear the area, excavate down a few inches, and compact the soil creates a solid foundation that will keep your driveway stable and looking good for years.
How deep does my gravel driveway need to be? A good rule of thumb for a new driveway is a total depth of about 8 to 12 inches. This isn’t all one type of gravel, though. You’ll start with a solid base layer of about 4 to 6 inches of a larger aggregate, which you’ll compact thoroughly. Then, you’ll add your top layer of finer gravel, like Class 5, in thin layers of 2 to 3 inches at a time, compacting each one before adding the next. This layered approach is what creates a truly durable surface.
Is landscape fabric really worth the effort? Yes, absolutely. This is a step you don’t want to skip. Laying down a quality landscape fabric over your compacted base does two very important things. First, it acts as a powerful barrier to stop weeds from growing up through your new gravel, which saves you a ton of maintenance. Second, it keeps your gravel separate from the soil below, preventing the stones from slowly sinking into the ground over time.
How do I stop my gravel driveway from getting ruts and potholes? Preventing ruts comes down to three key things: proper compaction, good drainage, and regular maintenance. When you install the driveway, make sure you compact the material in thin layers to create a solid, interlocked surface. Grade the driveway with a slight crown or slope so water runs off instead of pooling. Finally, a little upkeep goes a long way; just rake the gravel smooth a few times a year to fill in any low spots before they become bigger problems.