A pile of gravel in your driveway can feel like the start of a long, back-breaking weekend. Many people think spreading it is just a matter of raking it level, but this often leads to a bumpy, uneven surface that develops ruts and puddles after the first big rain. Professional gravel spreading services are the solution to these common frustrations. It’s a precise process that involves more than just moving rocks around. It’s about proper site preparation, using the right equipment for even distribution, and compacting the material to create a stable, long-lasting foundation for your driveway, path, or patio.
Key Takeaways
- A Professional Finish Prevents Future Headaches: Proper gravel installation involves more than just spreading stone. Professionals use specific techniques like site grading and compaction to ensure correct drainage and prevent ruts, saving you from costly repairs later on.
- Material Selection and Site Prep are Crucial: The success of your project depends on choosing the right material for the job, like Class 5 for driveways, and properly preparing the site. Always clear, level, and compact the ground before any gravel is delivered.
- Choose Your Partner Wisely: When hiring a gravel spreading service, look for a company with proven experience, professional equipment like skid steers, and a strong local reputation. A reliable partner will provide a clear, detailed quote and simplify the entire process.
What is Professional Gravel Spreading?
When you think about laying a gravel driveway or path, you might picture a truck dumping a pile of rocks and someone spending a weekend raking it flat. Professional gravel spreading is a far more precise and technical process. It’s a service designed to create a smooth, durable, and long-lasting surface by ensuring the gravel is spread evenly and compacted correctly. This professional touch helps you avoid common headaches like bumpy surfaces, poor drainage, and the need for expensive fixes down the road.
Think of it as the difference between a quick patch and a permanent solution. A professional service considers the entire project, from preparing the ground underneath to selecting the right type of stone for your specific needs. The goal isn’t just to cover the ground; it’s to build a stable, functional surface that can handle traffic, weather, and years of use without developing ruts or washing away. It’s about getting the job done right the first time, saving you from future maintenance and frustration.
The Right Tools and Techniques for a Flawless Finish
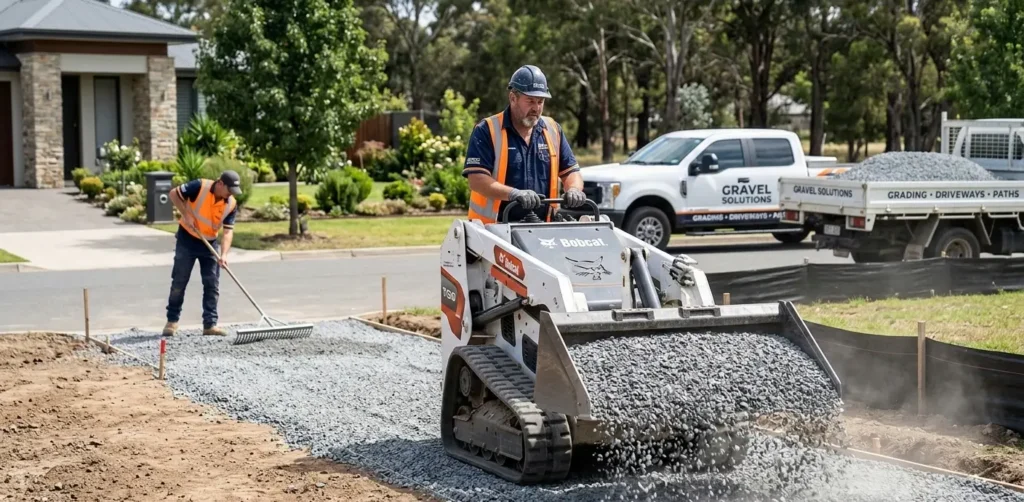
Achieving a perfectly smooth and stable gravel surface depends on having the right equipment and using proven techniques. Professionals use specialized machinery like skid steers to spread and level materials with an efficiency and precision that’s nearly impossible to replicate by hand. These powerful tools ensure the gravel is distributed in even layers, which is a critical first step for a uniform finish. Our team provides expert skid steer services to handle this part of the job perfectly.
Beyond the equipment, the technique is what truly sets a professional job apart. Proper preparation is the most important step for a gravel surface that lasts. This involves compacting the ground before any gravel is laid to create a solid foundation. Then, the gravel is spread in thin layers, with each layer being compacted to ensure the stones lock together tightly. This methodical process prevents future ruts and drainage problems, creating a solid base that will perform well for years.
Your Guide to Different Gravel Types
Not all gravel is created equal, and choosing the right kind is essential for the success of your project. A professional will help you select the best material after evaluating your site and understanding how you plan to use it. For driveways that will see regular vehicle traffic, you’ll want a crushed stone that is typically ¾-inch to 1-inch in size. This type of gravel, often called Class 5 gravel in Minnesota, has angular edges that interlock to form a stable, strong surface that also allows for proper water drainage.
For other projects, different materials might be a better fit. Decorative pathways and garden areas often use smaller, rounded stones like pea gravel for a more comfortable walking surface and a softer look. For areas that need serious erosion control, larger stones known as riprap are used. An experienced supplier can walk you through the options and make a recommendation based on your project’s specific demands, taking all the guesswork out of the equation.
Should You DIY or Hire a Pro?
Deciding whether to tackle a gravel project yourself or bring in a professional is a big question. While rolling up your sleeves and doing it yourself can feel rewarding, spreading gravel correctly is more complex than it looks. It involves careful planning, the right equipment, and a bit of expertise to get a smooth, long-lasting surface. Before you rent equipment or start shoveling, it’s helpful to weigh the real costs in time, effort, and final results. Let’s break down what a professional service brings to the table, so you can make the best choice for your project.
Why Professional Service Saves You Time and Effort
A gravel project can quickly consume your entire weekend, or even longer. The process involves more than just moving material; it requires preparing the site, ensuring the depth is consistent, and compacting it properly. When you hire a professional, you’re not just getting an extra set of hands, you’re getting efficiency. They have the experience to get the job done right the first time. Professional gravel spreading ensures the material is laid evenly, which helps prevent future issues like potholes, drainage problems, and uneven surfaces. This saves you from the headache of making costly and time-consuming fixes down the road.
The Advantage of Proper Equipment and Expertise
Having the right tools is critical for a flawless finish, and most homeowners don’t have a skid steer parked in their garage. Professionals arrive with specialized equipment designed to spread and level materials efficiently. Our skid steer services allow us to handle large volumes of gravel, sand, or dirt with precision. Beyond the machinery, you get the operator’s expertise. A pro knows how to properly grade the site for correct water drainage and compact the base to create a stable, durable surface that will stand the test of time. This combination of professional-grade equipment and hands-on experience is what separates a DIY job from a polished, professional one.
Common Myths About DIY Gravel Projects
One of the biggest myths about DIY gravel projects is that you can just dump the material and rake it around. In reality, simply dumping gravel is not enough. It’s crucial to distribute it evenly to avoid creating high and low spots that can lead to puddles and an uneven surface. Another common misconception is that DIY is always the cheaper option. Once you factor in equipment rental costs, the value of your own time, and the potential for mistakes that need fixing, the price difference can shrink significantly. Using a tool like a cubic yardage calculator can help you plan material needs, but a professional ensures that material is installed effectively.
Top Uses for Professional Gravel Spreading
Gravel is more than just a pile of rocks; it’s a versatile material that can solve problems and add value to your property. When spread by a professional, it creates a durable, functional, and polished surface for a wide range of projects. From building a sturdy driveway to crafting a charming garden path, here are some of the most common and effective uses for professional gravel spreading.
Building and Maintaining Driveways
A gravel driveway is a classic, cost-effective choice that stands up well to Minnesota’s tough weather. When installed correctly, it provides excellent stability and allows snowmelt and rain to drain away, preventing puddles and ice patches. For a long-lasting driveway, you’ll want a layer of gravel about four to six inches deep. A material like Class 5 gravel is a popular choice because the mix of rock and fines compacts tightly, creating a solid surface. A professional service ensures the base is properly prepared and the gravel is spread evenly and compacted, giving you a smooth, durable driveway that will last for years with minimal upkeep.
Creating Beautiful Pathways and Landscaping
Gravel is also a fantastic tool for enhancing your yard’s appearance. You can use it to create elegant garden pathways, functional walkways, or decorative features around flower beds and patios. For areas where you’ll be walking, a smaller, smoother gravel like pea gravel or ⅜-inch crushed stone is more comfortable underfoot. Professional spreading is key to achieving that clean, manicured look. An expert team can create crisp edges and ensure an even depth, preventing weeds from poking through and keeping the material from scattering. It’s a simple way to add texture and definition to your outdoor living spaces.
Preparing Sites for Construction and Drainage
A solid foundation is critical for any construction project, whether you’re building a shed, a garage, or a new patio. Gravel is often the first layer, used to create a stable and level base that won’t shift over time. Professional crews handle the essential site grading and use the right equipment to ensure proper compaction. They can also help solve drainage issues by using gravel to create French drains or other systems that direct water away from your home’s foundation. Using a professional service ensures the right type and amount of gravel is used for your project’s specific load-bearing and drainage needs.
How Much Does Gravel Spreading Cost?
Figuring out the budget for a gravel project is a top priority for most homeowners and contractors. While there isn’t a single flat rate, you can get a good idea of what to expect. The cost of spreading gravel depends heavily on the specifics of your project. As a general benchmark, a full truckload of gravel, which is typically 10 to 13 tons, can run anywhere from $500 to $1,000. This amount usually covers a 100 to 130-square-foot area with a solid six-inch layer.
Of course, this is just a starting point. The final price tag is influenced by several key variables that can cause the cost to shift up or down. Understanding these factors will help you plan your budget more effectively and ensure there are no surprises along the way. From the type of stone you choose to the condition of your project site, every detail plays a part in the total investment required to get that smooth, professional finish you’re looking for.
What Factors Influence the Price?
Several key elements come together to determine the final cost of your gravel spreading project. First is the type of gravel you select. Different materials have different price points; for example, a versatile Class 5 gravel might have a different cost than decorative pea gravel. The size of your project is another major factor. A long driveway will naturally require more material and labor than a small garden path. You can use a cubic yardage calculator to get a better sense of the volume you’ll need. Finally, consider the current state of the site. If the area needs significant prep work, like grading or clearing, the use of professional skid steer services will be factored into your quote.
How to Get an Accurate Project Quote
To get a precise and reliable quote, the best thing you can do is provide as much detail as possible. Start by measuring the length, width, and desired depth of the area you want to cover. Having these dimensions ready will help your supplier calculate the exact amount of material needed. Next, think about the site itself. Is it level ground, or does it have a slope? Is it clear, or are there weeds, old pavement, or debris that needs to be removed first? When you reach out for an estimate, share this information along with your preferred type of gravel. The more specific you are, the more accurate your quote will be, helping you avoid unexpected costs and plan your project with confidence.
How to Choose the Right Gravel Spreading Company
Picking the right company to handle your gravel project is a big step. The right partner ensures your driveway, path, or construction site is done correctly the first time, saving you from future headaches and costs. A great gravel spreading service combines skill, the right materials, and a solid reputation. When you’re ready to hire a pro, you’ll want to do a little homework to find a company that is reliable and has the expertise your project needs. Looking at their past work, the services they offer, and what other customers are saying will give you a clear picture of who you’re dealing with. This helps you make a choice you can feel good about, ensuring your project turns out exactly as you envisioned.
Look for Proven Experience and Quality Equipment
When you start vetting companies, look for a team with a solid track record. Proven experience means they’ve handled projects similar to yours and understand the specific challenges of working with Minnesota’s terrain and climate. Ask to see examples of their work or for references. A professional company will also use quality equipment to get the job done right. Proper ground preparation and even spreading are key to a long-lasting surface, and that requires more than a shovel and a wheelbarrow. Companies that use professional-grade machinery, like those offering skid steer services, can guarantee a smooth, well-compacted finish that improves drainage and durability.
Review Their Service and Material Options
Finding a company that offers both material delivery and spreading services can make your project much simpler. It saves you the hassle of coordinating between a supplier and a contractor. Check what types of materials they offer. A versatile provider will have a range of options to suit different needs, whether you’re building a rustic path with crushed stone or a sturdy driveway with Class 5 gravel. Having one point of contact for everything from ordering materials to the final spread streamlines the process. This ensures you get the right product for your project and that it’s installed correctly, all from a single, reliable source.
Check Customer Reviews and Local Reputation
Before you make a final decision, take a few minutes to see what past customers have to say. Online reviews on platforms like Google or local community forums can offer honest insight into a company’s reliability, professionalism, and the quality of their work. Look for comments about their punctuality, communication, and how they handled any unexpected issues. A strong local reputation is often the best indicator of a trustworthy company. Businesses that consistently deliver great results and provide excellent customer service earn the respect of the community. Positive feedback from your neighbors is a good sign you’ve found a company that will treat your project with care.
How to Prepare for Your Gravel Project
A successful gravel project starts long before the delivery truck arrives. Properly preparing your site sets the stage for a durable, long-lasting surface that looks great and functions perfectly. Whether you’re building a driveway, a garden path, or a new patio base, these steps will help you get everything in order. Good preparation is the key to avoiding common issues like ruts, weeds, and poor drainage down the road. A little extra effort now saves you from headaches and repair costs later.
Getting Your Site Ready
First things first, you need a clean slate. Clear the entire project area of any grass, weeds, rocks, and other debris. Once the surface is clear, excavate the soil to the proper depth for your project. A good rule of thumb is to dig deep enough to accommodate a solid base layer plus your top layer of gravel. For a strong foundation, lay down a 2- to 4-inch base of a material like Class 5 gravel. This creates a stable sub-base that prevents your decorative gravel from sinking into the soil and helps with drainage.
Planning Your Project and Choosing Materials
Choosing the right gravel is crucial. For a driveway that will see vehicle traffic, a ¾-inch to 1-inch crushed stone is a great choice because the angular pieces lock together to form a stable surface. For a garden path, you might prefer smaller, more decorative pea gravel. Consider the project’s purpose, drainage needs, and the slope of the land when making your selection. You also need to figure out how much material to order. Using a cubic yardage calculator can help you get an accurate estimate so you don’t end up with too much or too little gravel.
How to Handle Common Challenges
The secret to a gravel surface that lasts for decades instead of just a few years is compaction. After clearing and excavating your site, you must compact the soil before adding any material. Then, spread your base material and compact it thoroughly. Finally, add your top layer of gravel in thin layers, compacting each one as you go. This process prevents the surface from developing ruts and ensures water drains properly. If the job feels too big, our professional skid steer services can handle the grading and compaction for you, guaranteeing a solid and level foundation.
Finding a Reliable Gravel Spreading Service
Finding the right team to spread your gravel is just as important as choosing the right material. A professional service ensures your new driveway, path, or foundation is installed correctly, giving you a smooth, durable surface that lasts for years. The right partner will have the proper equipment and know-how to handle site preparation, grading, and compaction, which are key steps for preventing future headaches like potholes and drainage issues. Taking the time to find a trustworthy company will pay off in the long run, saving you from costly repairs and giving you a finished project you can be proud of.
Where to Start Your Search
A great place to begin your search is with local recommendations. Ask friends, family, or neighbors who have recently completed similar projects. You can also check with local hardware or landscaping supply stores, as they often have a list of trusted contractors they work with. A simple online search for “gravel services near me” will give you a list of local companies, but be sure to look beyond the first few results. Some of the best contractors are smaller, local operations. You can also check with your materials supplier; companies that deliver aggregates often provide skid steer services for spreading and grading or can recommend reliable partners they trust.
How to Vet Your Options and Make the Right Choice
Once you have a shortlist of potential companies, it’s time to do a little homework. Start by checking their online presence for photos of past work and customer reviews. When you call for a quote, ask about their experience with projects like yours and if they are licensed and insured. A professional will be happy to provide this information. Be sure to get a detailed, written estimate that breaks down the costs for labor, equipment, and materials. You can even prepare for this conversation by using a cubic yardage calculator to get a rough idea of how much material you’ll need. Finally, trust your gut. Choose a company that communicates clearly and makes you feel confident in their ability to get the job done right.
Related Articles
- Gravel Calculator Tons: 4 Steps to an Accurate Order – Minnesota Aggregates
- What is the Best Gravel for a Driveway? 5 Types Compared – Minnesota Aggregates
- Skid Steer Services | Grading, Clearing & Site Prep
Frequently Asked Questions
How do I figure out how much gravel I actually need? The best way to get a close estimate is to use a cubic yardage calculator, which does the math for you. You’ll need to measure the length and width of your project area, and then decide on the depth. For a driveway, a depth of four to six inches is a good target. Having these numbers ready will help you plan your budget and ensure you order the right amount of material without running short or having a huge pile left over.
What makes professional spreading different from just having gravel dumped in my driveway? The difference is in the foundation and the finish. A simple dump-and-rake job often leads to an uneven surface that develops ruts and drainage problems quickly. Professional spreading is a methodical process that involves preparing and compacting the ground first, then spreading the gravel in even layers. Each layer is compacted to create a stable, interlocked surface that will hold up to traffic and weather for years to come.
Is Class 5 gravel the only option for a driveway? While Class 5 is an excellent and popular choice for driveways in Minnesota due to how well it compacts, it’s not your only option. Other types of crushed, angular stone can also create a very stable surface. The best material depends on your specific site conditions and how much traffic the area will get. A professional can assess your property and recommend the ideal gravel to ensure your driveway is both durable and functional.
What kind of site prep do I need to do before the team arrives? To get your site ready, you should clear the area of any surface debris like branches, large rocks, or equipment. It’s also helpful to mark the exact boundaries of your project with stakes or spray paint so the crew knows precisely where to work. While you can handle this initial clearing, a professional service will take care of the more intensive work, like excavating grass and soil or grading the site for proper drainage.
How long does a professionally installed gravel surface last? When a gravel surface is installed correctly with a proper compacted base, it can easily last for decades. The key is the professional installation, which prevents the common issues that cause DIY projects to fail, such as poor drainage and rutting. You might need to do some minor maintenance, like occasional raking or adding a thin top layer every few years, but the solid foundation will stand the test of time.