Spreading gravel isn’t a one-size-fits-all task. The tools you’d use for a small garden walkway are completely different from what you’d need for a long rural driveway or a commercial parking lot. Using a shovel and rake on a massive project will leave you exhausted and with an uneven finish, while bringing heavy machinery into a tight space is impractical. Matching the tool to the scale of your work is essential for efficiency and a quality result. This article is your complete guide to finding the best equipment for spreading gravel for your specific project, helping you understand the pros and cons of everything from basic rakes to advanced skid steer attachments.
Key Takeaways
- Choose equipment based on your project’s size: Hand tools like rakes and shovels work well for small jobs, but you’ll need a tractor or skid steer attachment for larger areas like driveways to get the job done efficiently.
- A lasting surface starts with proper installation: For a stable, professional result, always prepare a solid base, apply gravel in thin compacted layers, and create a crown in the center to ensure proper water drainage.
- Protect your investment with routine maintenance: Keep your gravel looking its best by regularly smoothing ruts, managing weeds, and ensuring drainage paths are clear, which prevents small issues from becoming costly repairs.
What Are the Best Tools for Spreading Gravel?
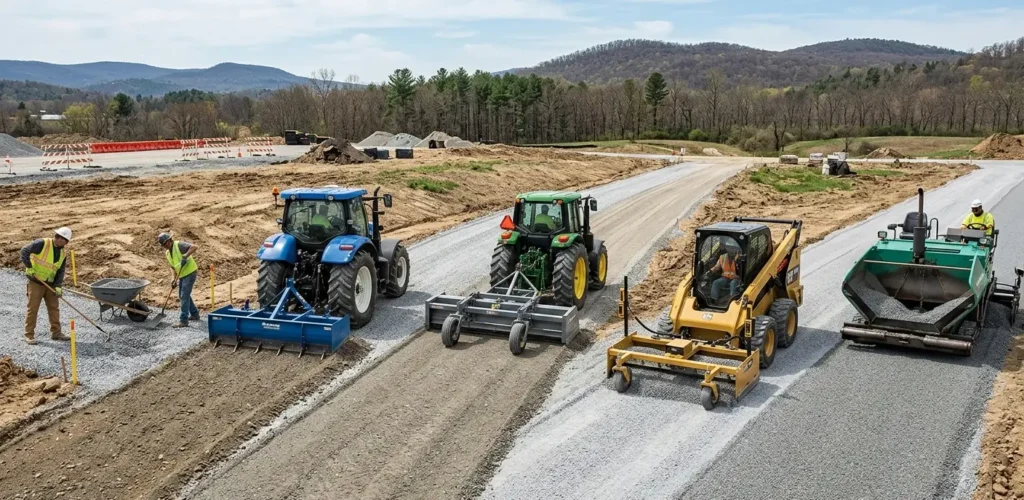
Once your pile of fresh Class 5 gravel arrives, the next step is spreading it evenly. The right tool for the job can make all the difference, saving you time, effort, and a lot of frustration. Choosing the best equipment really comes down to the size of your project and the kind of finish you’re aiming for. You wouldn’t use a spoon to dig a trench, and you wouldn’t bring a massive excavator into a small garden. The same logic applies here.
For small-scale projects like a garden path or a quick patch-up, simple hand tools might be all you need. But if you’re laying a new driveway or grading a large lot, you’ll want to look at more powerful equipment that attaches to a tractor or skid steer. These machines are designed to handle large volumes of material efficiently and give you a smooth, professional-looking surface. Let’s walk through the most common options, from basic hand tools to specialized machinery, so you can find the perfect match for your project.
Hand Tools for Small Projects
If you’re working on a smaller area or just need to do some touch-ups, you don’t need to overcomplicate things. A few reliable hand tools will get the job done perfectly. Your go-to combination will be a sturdy spade shovel and a bow rake, also known as a landscaping rake. Use the shovel to move the gravel from the pile to where you need it, and then use the bow rake to spread it out and create a level surface. This hands-on approach gives you complete control over the final result, which is ideal for detailed work around garden beds or tight corners. It’s a simple, effective, and budget-friendly method for any DIY enthusiast.
Box Blades for Large Areas
When you’re tackling a bigger project like a long driveway or a parking area, hand tools just won’t cut it. This is where a box blade comes in. A box blade is an attachment that connects to the back of a tractor and is fantastic for spreading large amounts of gravel quickly. It has scarifiers, which are metal teeth that can rip up compacted ground, and a blade that scrapes and levels the material as you drive. It’s especially useful for filling in ruts and creating a solid, even base. If you have a tractor and a lot of ground to cover, a box blade is one of the most efficient tools you can have in your arsenal.
Land Planes for a Precise Finish
If you want a surface that’s not just level but perfectly smooth, a land plane might be a better choice than a box blade. While a box blade is great for moving and rough-grading material, a land plane excels at creating a fine, polished finish. It works by cutting off high spots and automatically filling in the low spots as you drag it across the surface. Think of it as the finishing touch for your gravel project. Many people find that a land plane is easier to use for final grading because it’s less likely to create waves or washboards in the gravel, giving you a more professional and long-lasting result.
Versatile Skid Steer Attachments
For ultimate efficiency, nothing beats a skid steer with the right attachment. A multi-task paver spreader, for example, can spread, level, and compact gravel or asphalt millings all in one pass. This is a huge time-saver for contractors and homeowners with large-scale projects. Using a skid steer allows you to handle heavy materials with precision and speed. If you don’t own the equipment, our professional skid steer services can take care of the heavy lifting for you, ensuring your project is done right and on schedule. This option is perfect for achieving consistent results without the hassle of renting or buying specialized machinery.
Specialized Gravel Spreaders
For the biggest jobs or for those who demand absolute perfection, specialized equipment is the way to go. Motorized graders and gravel rakes are designed specifically for spreading and grading aggregate with maximum efficiency and consistency. These machines are what the pros use for building roads and large commercial lots. While they represent a significant investment, they deliver unparalleled results for very large-scale projects. For most homeowners, this level of equipment is overkill, but for contractors or those with extensive property to manage, these specialized tools can be a game-changer, making quick work of even the most demanding jobs.
Comparing Your Gravel Spreading Options
Once you know what tools are out there, the next step is figuring out which one is right for your project. The best choice depends on your project’s size, your budget, and the finish you’re aiming for. Making the right choice from the start saves you time, money, and a lot of frustration. It’s the difference between a smooth, professional-looking driveway and one that’s uneven and prone to ruts after the first big rain. A little planning now ensures your hard work pays off for years to come.
To help you decide, we’ll walk through the most common comparisons you’ll face. We’ll start with the basics: hand tools versus powered equipment, and why a simple rake might be perfect for one job but completely impractical for another. Then, for those with a tractor, we’ll get into the specifics of attachments, comparing the heavy-duty box blade with the fine-tuning capabilities of a land plane. We’ll also cover how to match your equipment to the scale of your work, whether you’re tackling a small patio or a massive parking area. Finally, we’ll explore the practical questions of renting versus buying and the importance of checking your tractor’s compatibility before you commit. Let’s break it all down.
Hand Tools vs. Powered Equipment
The most fundamental choice you’ll make is between muscle and machine. Hand tools like a sturdy wheelbarrow, shovel, and landscape rake are perfect for small-scale jobs. If you’re creating a garden path, filling a small patch, or touching up edges, these tools give you precise control. Spreading gravel with a rake takes patience, but it works well for tight spaces where larger equipment can’t go.
For anything larger, powered equipment is the way to go. A tractor or skid steer can spread a full truckload of Class 5 gravel in a fraction of the time it would take by hand. While the initial cost is higher, the time and labor you save on big projects make it a worthwhile investment.
Box Blade vs. Land Plane: Which Is Better?
If you’re using a tractor, the box blade and land plane are two of the most common attachments for working with gravel. A box blade is a true workhorse. It’s designed to dig in, move large amounts of material, and fill in deep ruts, making it ideal for building a new road or performing heavy repairs.
A land plane, on the other hand, is more of a finishing tool. It excels at smoothing out high spots and filling in low spots to create a perfectly level surface. Think of it this way: use a box blade for the heavy lifting and major shaping, then follow up with a land plane to get that smooth, professional-grade finish.
Matching the Tool to Your Project Size
It’s crucial to match your equipment to the scale of your job. A wheelbarrow is great for a few hundred pounds of gravel, but it’s not practical for moving several tons. For medium to large driveways or parking areas, you’ll want at least a compact tractor with an attachment.
If you’re tackling a very large project that involves multiple truckloads of gravel, renting a skid steer is often the most efficient option. These machines are powerful and can move material quickly. For the biggest jobs, or if you’re short on time, consider hiring a professional. Our skid steer services can handle the spreading for you, ensuring the job is done right.
Renting vs. Buying Your Equipment
Should you rent or buy? If you only need equipment for a one-time project, renting is almost always the most cost-effective choice. It gives you access to high-quality, well-maintained machines without the long-term commitment of ownership, storage, and upkeep. A good equipment rental guide can help you understand your options.
Buying makes sense if you own a large property and plan to do regular maintenance, like regrading a long driveway every year. You can often find used equipment to fit a tighter budget. Before you buy, weigh the purchase price against the cost of renting and consider how often you’ll realistically use the machine.
Checking Power and Tractor Compatibility
If you decide to use an attachment with your own tractor, compatibility is key. Not every attachment works with every machine. Before you rent or buy, check the attachment’s horsepower requirements and make sure your tractor can handle it. You’ll also need to confirm that the hitch system matches, as most attachments use a standard 3-point hitch.
Also, consider the hydraulic connections. Some attachments, like a box blade with a hydraulic scarifier, require specific hydraulic ports on your tractor. Always review your tractor’s manual and the attachment’s specifications to ensure they’ll work together safely and effectively. This simple check can save you from a major headache.
How to Choose the Right Gravel Spreader
Picking the right gravel spreader is about matching the tool to your specific job. The perfect piece of equipment for a long rural driveway might be overkill for a small garden path. Thinking through a few key factors before you rent or buy will save you time, money, and a lot of frustration. By considering your project’s scale, the material you’re using, and your own comfort level with the equipment, you can find the most efficient way to get a smooth, even surface that lasts.
Consider Your Project’s Size
The scope of your project is the first thing to consider. If you’re just touching up a small walkway or a patio base, simple hand tools like a heavy-duty rake and a wheelbarrow might be all you need. For larger projects, like a new driveway or a parking area, you’ll want something more powerful. For these bigger jobs, you should look into renting heavy machinery or hiring a professional. A skid steer can spread large amounts of gravel quickly and evenly, turning a weekend-long project into a few hours of work. Our skid steer services are a great option if you want the job done right without the hassle of operating unfamiliar equipment.
Factor in Your Gravel Type
Not all gravel is created equal, and the type you choose will influence your spreader selection. Smaller, more rounded stones like pea gravel flow easily and can be managed with simpler tools. Larger, angular materials like Class 5 gravel compact tightly to create a stable base but require sturdier equipment to move and level effectively. A basic spreader might struggle with heavy, coarse aggregate. Make sure the equipment you choose is rated for the size and weight of your specific gravel to ensure you get an even distribution and a stable, long-lasting surface for your driveway or path.
Assess Your Skill Level
Be realistic about your experience with landscaping equipment. While spreading gravel with a rake just requires a bit of physical effort and a good eye, operating a tractor or skid steer attachment is a different story. If you’re not comfortable behind the controls of heavy machinery, a DIY approach on a large project could lead to an uneven finish or even safety issues. For many homeowners, hiring a professional for the spreading and grading part of the project is the most effective route. It ensures the job is done correctly and safely, giving you a professional-grade result without the steep learning curve.
Plan Your Budget
Your budget will naturally play a big part in your decision. Hand tools are the most affordable option, but they demand the most physical labor. For larger projects, you’ll need to weigh the cost of renting equipment against hiring a professional. Renting a skid steer and attachments for a weekend can be cost-effective if you have the skills to use them. However, when you factor in delivery fees and your own time, sometimes hiring an expert is the better value. Use our cubic yardage calculator to estimate your material costs first, which will help you see how much of your budget is left for equipment or professional services.
Check Your Site’s Accessibility
Before you rent a large piece of machinery, take a good look at your project area. Do you have narrow gates, low-hanging branches, or tight corners? The best spreader in the world won’t help you if you can’t get it to the worksite. Measure access points and consider the terrain. Steep slopes or soft, muddy ground can pose a challenge for heavy equipment. A smaller, more maneuverable machine or even hand tools might be the only practical option for hard-to-reach spots. Planning for accessibility ahead of time prevents frustrating delays on the day of your project.
Look at Hydraulic and Adjustment Features
If you’re using a tractor or skid steer, the attachment’s features are key to getting a precise finish. Look for spreaders and graders with hydraulic controls, which allow you to make fine adjustments to the angle and depth from the operator’s seat. This is especially helpful for creating a crown in a driveway for proper drainage. Some attachments, like a power rake, are incredibly versatile and can break up compacted soil, level gravel, and prepare a seedbed. While these advanced tools have a higher rental cost, their precision and efficiency can produce a much better final result.
How to Spread Gravel Like a Pro
Once you have the right equipment and your gravel has been delivered, it’s time to get to work. Spreading gravel correctly is about more than just dumping it on the ground; it’s a process that ensures your driveway or path is stable, drains properly, and lasts for years. Following these steps will give you a professional-grade finish that stands up to Minnesota weather and daily use.
Prepare and Level the Base
A solid base is the key to a lasting gravel surface. Before you even think about spreading your top layer, you need to ensure the ground underneath is properly prepared and compacted. If your gravel is constantly spilling over the edges or sinking in spots, it’s a clear sign that the base needs attention. Start by clearing any vegetation and debris, then rake the area to create a level surface. For driveways and high-traffic paths, installing a compacted sub-base of a material like Class 5 gravel is essential for stability and proper drainage.
Apply Gravel in Controlled Layers
Resist the urge to dump all your gravel at once. The secret to a dense, stable surface is to apply the material in thin, controlled layers, or “lifts.” Spread an initial layer of gravel about two to three inches deep across the entire area. Once that first layer is down, compact it thoroughly before adding the next one. Repeating this process creates a tightly packed surface that won’t shift or develop soft spots over time. This methodical approach ensures every part of your project is uniformly solid from the ground up.
Break Up Compacted Ground
If you’re working with hard, compacted soil, you’ll need to loosen it up before laying your base. This allows the new material to integrate with the ground instead of just sitting on top. A box blade with scarifier blades is perfect for this job. Set the blades to a medium depth and make a few passes over the area to break up the soil. For homeowners, this might be the most challenging step, which is why hiring professional skid steer services can be a huge time-saver, ensuring the ground is perfectly prepped for your project.
Use Overlapping Passes for Even Coverage
Whether you’re compacting the base or spreading the final layer of gravel, consistency is everything. To achieve an even, firm surface, make two to three overlapping passes with your equipment. This technique helps remove air pockets and ensures that every square foot of the soil or gravel is uniformly compacted. Taking the time to overlap your passes prevents weak spots from forming and gives your project a smooth, professional appearance that will hold up much better in the long run. It’s a simple step that makes a big difference.
Create a Crown for Proper Drainage
Water is the number one enemy of a gravel driveway. To prevent puddles, potholes, and washouts, you need to give water a clear path to run off. The best way to do this is by creating a slight “crown” in the center of your driveway or path. This means making the middle slightly higher than the edges. As rain falls, it will naturally flow off to the sides instead of pooling in the middle. You can create this gentle slope with a box blade, ensuring your surface stays drier and more stable through every season.
Compact the Surface for Lasting Results
The final step is to compact the entire surface one last time. This locks all the gravel together, creating a durable, solid finish that can handle vehicle traffic and resist erosion. For larger areas, using a plate compactor attachment on a skid steer provides the most even and effective compaction. This step is especially important for materials like asphalt milling, which contains residual tar that helps it bind together tightly when compacted. A well-compacted surface is the finishing touch that ensures your hard work pays off with a beautiful, long-lasting result.
Keep Your Gravel Surface Looking Great
Once your gravel is perfectly spread, the work isn’t quite over. Proper maintenance is the key to keeping your driveway, path, or lot looking sharp and functioning well for years to come. A little upkeep prevents bigger problems like deep ruts, pooling water, and stubborn weeds from taking over. By staying on top of a few simple tasks, you can protect your investment and ensure your surface remains smooth, stable, and attractive. Think of it as a long-term partnership with your property. Regular care not only preserves the look but also extends the life of your gravel, saving you time and money on major repairs down the road. These next steps will help you create a simple and effective maintenance routine.
Gather Your Maintenance Tools
Having the right equipment on hand makes routine upkeep much easier. You don’t need a shed full of expensive machinery; a few key hand tools will handle most day-to-day tasks. A sturdy landscape rake or gravel rake is essential for smoothing out uneven spots and removing debris. A wheelbarrow is perfect for moving fresh gravel to fill in low areas, while a flat-head shovel helps with scooping and leveling. Using the proper tools not only simplifies the job but also helps prevent back strain. For larger properties, you might keep a drag harrow or a small box blade attachment for your tractor to make grading quicker and more efficient.
Grade and Smooth the Surface Regularly
Over time, traffic and weather will create ruts, potholes, and low spots in your gravel. It’s important to address these issues before they become major hazards. Walk your gravel surface regularly, especially after heavy rain, to spot any problem areas. Use your rake to pull gravel from high spots into the ruts, creating a level surface. For deeper holes, you’ll need to add new material. We recommend topping off your surface with fresh Class 5 gravel to maintain a consistent depth and ensure proper compaction. Keeping the surface smooth prevents water from pooling and creating soft spots, which can quickly worsen.
Manage Drainage and Water Runoff
Water is the biggest enemy of a gravel surface. If it doesn’t drain properly, it will wash away your gravel, create ruts, and soften the base. A well-maintained gravel driveway should have a crown, meaning the center is slightly higher than the edges. This gentle slope encourages water to run off to the sides instead of sitting on the surface. Many installers skip this step, so you may need to create a pitch yourself by grading the gravel. Also, be sure to keep the ditches or shoulders along the edges clear of debris so water has a place to go. Proper drainage is the single most important factor in your gravel surface’s longevity.
Keep Weeds Under Control
Nothing makes a gravel area look neglected faster than a crop of weeds. The best defense is a proactive one. Start by installing a quality landscape fabric under your gravel to block weeds from sprouting. For any that do manage to pop through, regular raking can dislodge young plants before they take root. If you’re already raking to smooth the surface, take a moment to inspect for weeds and bare spots. Pulling weeds by hand is effective for small patches. For larger areas, you might consider a pet-safe herbicide. Defining the edges of your gravel area with landscape edging or beds filled with quality black dirt can also help prevent grass from creeping in.
Care for Your Spreading Equipment
Whether you’re using a simple rake or a skid steer attachment, taking care of your equipment ensures it’s ready when you need it. After each use, clean dirt and gravel off your tools to prevent rust and wear. Store hand tools in a dry place, like a shed or garage. For powered equipment, follow the manufacturer’s maintenance schedule for tasks like checking fluid levels and lubricating moving parts. If you use a spreader, make sure it’s clean and empty before storing it. A well-maintained gravel spreader and other tools will perform better and last longer, making your maintenance routine that much smoother.
Related Articles
- Gravel Calculator Tons: 4 Steps to an Accurate Order – Minnesota Aggregates
- What is the Best Gravel for a Driveway? 5 Types Compared – Minnesota Aggregates
Frequently Asked Questions
What’s the biggest mistake people make when spreading gravel themselves? The most common error is poor base preparation. Many people get excited to lay the top layer of gravel and rush through what’s underneath. A solid, compacted base is the foundation for your entire project. If you spread gravel on soft, uneven ground, you’ll end up with ruts, soft spots, and drainage problems almost immediately. Taking the time to clear, level, and compact the ground first is the single most important step for a lasting result.
My project is too big for a rake, but I don’t own a tractor. What should I do? You have a couple of great options. Renting equipment like a skid steer for a day can be a cost-effective solution if you feel comfortable operating it. However, for a truly professional finish without the learning curve, consider hiring an expert. Our skid steer services are designed for this exact situation. We can handle the heavy lifting of spreading and grading for you, ensuring the job is done efficiently and correctly.
How do I create that “crown” for drainage you mentioned? Creating a crown just means making the center of your driveway or path slightly higher than the edges. This gentle slope allows rainwater to run off to the sides instead of pooling in the middle and creating potholes. You can achieve this with a box blade or land plane by adjusting the angle as you work. The goal is a subtle grade, typically a slope of about one-quarter to one-half inch per foot from the center to the edge.
How often do I really need to regrade my gravel driveway? This depends on how much traffic it gets and the kind of weather you experience, but a good general guideline is to plan for a full regrade once a year. Spring is often a great time, as you can fix any issues that developed over the winter. Beyond that, it’s smart to walk the driveway after heavy rainstorms to spot-fix any small ruts or low spots with a rake before they become bigger problems.
Can I use any type of gravel for my driveway? While you technically can use different types, some are far better suited for driveways than others. For a stable surface that can handle vehicle weight, you want an angular, crushed stone that compacts well, like our Class 5 gravel. This type of material locks together to form a solid base. Softer, rounded stones like pea gravel might look nice, but they will shift and rut easily under tires and are better for walkways or decorative areas.